1. What is GoInsight.AI?
GoInsight.AI is an AI Collaboration Workbench for enterprises. It is not just a tool for "boosting individual writing efficiency"; it turns AI and automation into reusable, governable, and measurable organizational capabilities:
- A small number of Builders build and publish AI applications and automated workflows behind the scenes;
- The vast majority of employees (Operators) invoke these capabilities directly through conversations and cards in the GoInsight Workspace to get work done, leaving behind traceable execution records.
2. GoInsight Workspace: The Unified Entry Point for Team Collaboration and Execution
GoInsight Workspace is the entry point most employees use every day. It includes:
- Collaboration Workspace: The main arena for team collaboration and execution (group/project spaces)
- Personal Chat: A personal space for conversations with AI (drafts/experiments/learning)
- Explore AI: The enterprise's internal "AI Capability Center," for browsing and searching available workflows/applications
- Builder Studio: The backend entry point for building and orchestrating workflows and AI applications
- My AI Usage: View AI usage data for individuals or the organization (with tiered permissions)
Within the Collaboration Workspace, teams can collaborate just like using IM, completing the following steps within a single conversation:
Discuss → @Invoke an AI assistant (or discuss with teammates) → Get results → Decide and hand off → Leave a record and review
Operators don't need to understand the underlying orchestration—they only need to see things like:
- "Create ticket"
- "Generate customer reply draft"
- "Equipment inspection/exception handling"
- "Generate daily/weekly report"
- "Reconciliation/approval assistance"
These business capability cards, commands, and assistants can be invoked directly within the conversation.
3. Builder and Operator: Two Modes of Work
The key to GoInsight.AI lies in "layering":
- Builder (the one who lays the tracks): In Builder Studio, Builders visually build workflows, connect systems, and configure permissions and policies, then publish capabilities to the Workspace for the team to reuse. Builders are typically IT/digital transformation staff, business leads, process owners, internal tool managers, and similar roles.
- Operator (the one who runs on the tracks): Operators use "published capabilities" in the Workspace without needing to understand nodes, variables, APIs, or other technical concepts. Most employees only need to learn to: search/select a capability → fill in parameters → view results → decide and collaborate.
4. Core Capabilities of GoInsight.AI
4.1 Visual Low-Code Orchestration (Builder Studio / Flow Editor)
Using the drag-and-drop Flow Editor, Builders can connect workflow logic, AI capabilities, and enterprise systems, supporting:
- Conditional branching, loops, variables, error handling, and other complex logic
- Packaging workflows as reusable capabilities and publishing them for team use
4.2 AI-Native Capabilities: LLM / Document Understanding / Structured Extraction / Knowledge Base Retrieval (RAG)
Within workflows, AI nodes can process unstructured content (emails, ticket descriptions, documents, etc.). Typical capabilities include:
- Summarizing, rewriting, classifying, and extracting structured data
- Retrieving from the enterprise knowledge base (RAG) before answering, so outputs stay aligned with enterprise terminology and grounded in fact
4.3 System Connectivity and Execution Closed-Loop: App Connectors + API Calls
Through App Connectors, HTTP/API nodes, and others, GoInsight.AI can connect to enterprise systems (such as CRM, ticketing, ERP, databases, device management platforms, etc.) to:
- Query and write system data
- Create records, update statuses, and send notifications
- Turn "AI suggestions" into "system actions," closing the workflow loop
4.4 Controllable Automation: Human-in-the-Loop (Manual Intervention/Approval)
At critical nodes, you can configure:
- Pausing to wait for manual confirmation
- Resuming execution after manual approval or additional input
- "Human review guardrails" on high-risk actions, keeping workflows both efficient and controllable
4.5 Enterprise-Grade Governance and Metrics
GoInsight.AI includes built-in:
- Permission controls (by department, team, or resource)
- Audit logs and traceability
- Usage and cost metrics (view token usage and calls by user, department, or workflow)
This lets enterprises "confidently scale AI adoption" while continuously reviewing results in practice.
Workflow Lifecycle: Create, Build, Configure, Debug, and Publish
Having covered the Workspace and role division, we'll now look at how Builders:
- Create workflows (interactive/service)
- Build, configure and debug them in the Flow Editor
- Publish them so the team can reliably reuse them in the Workspace
Step 1: Create a Workflow
You can import an existing DSL file or create a new workflow.
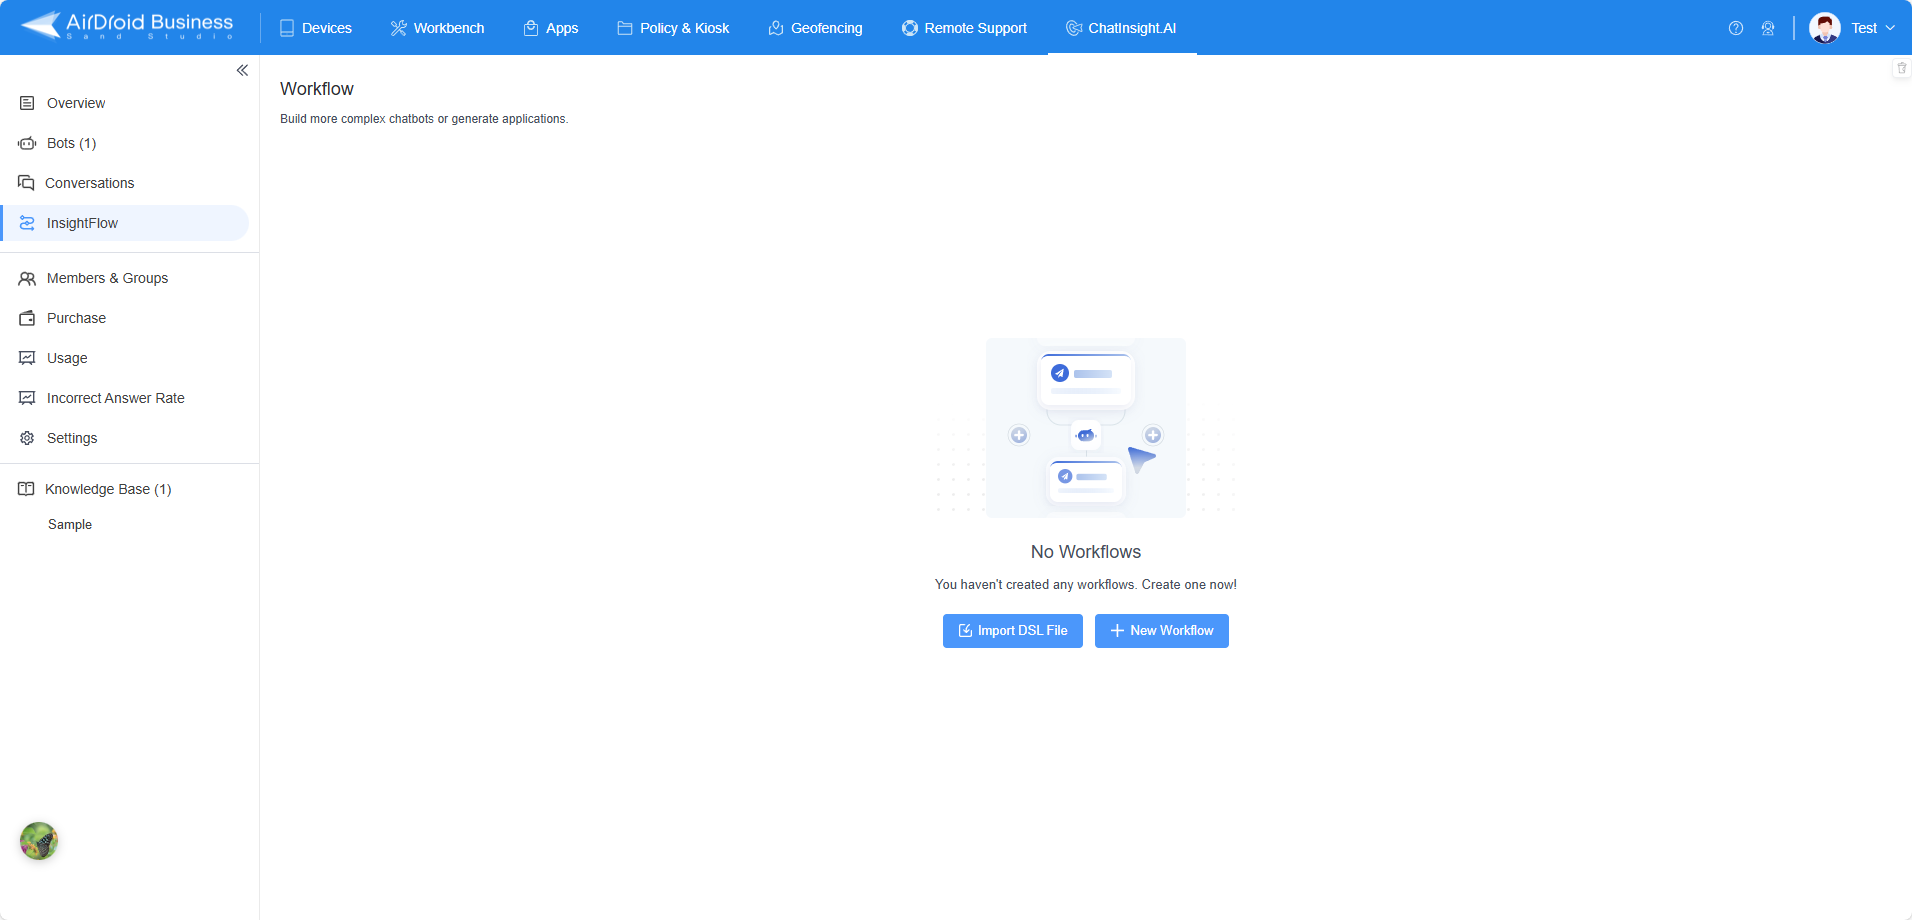
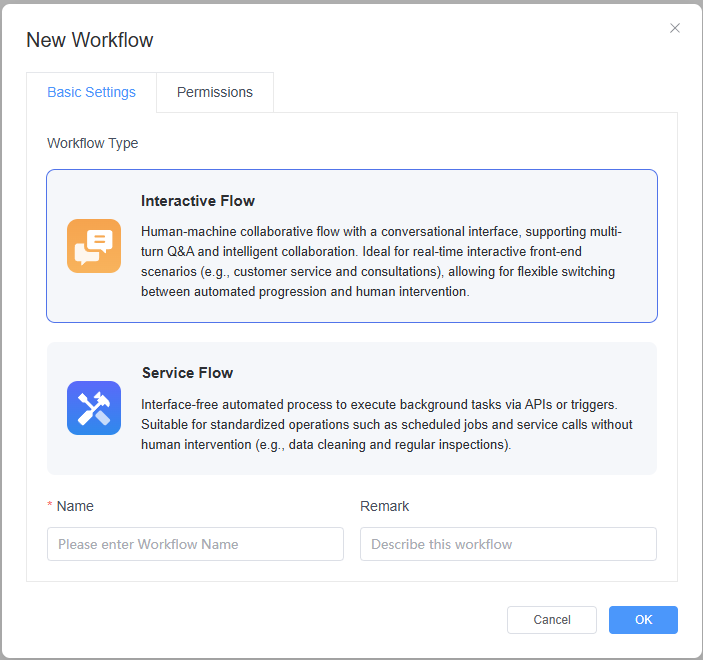
Example: To create a new workflow, click + Create Workflow, then:
- Enter the workflow name and workflow description.
- Select the workflow type. Workflow types include: interactive workflow and service workflow.
Step 2: Build, Configure and Debug a Workflow
Clicking a new or existing workflow takes you to its orchestration interface, where you can visually design and manage the workflow's nodes.
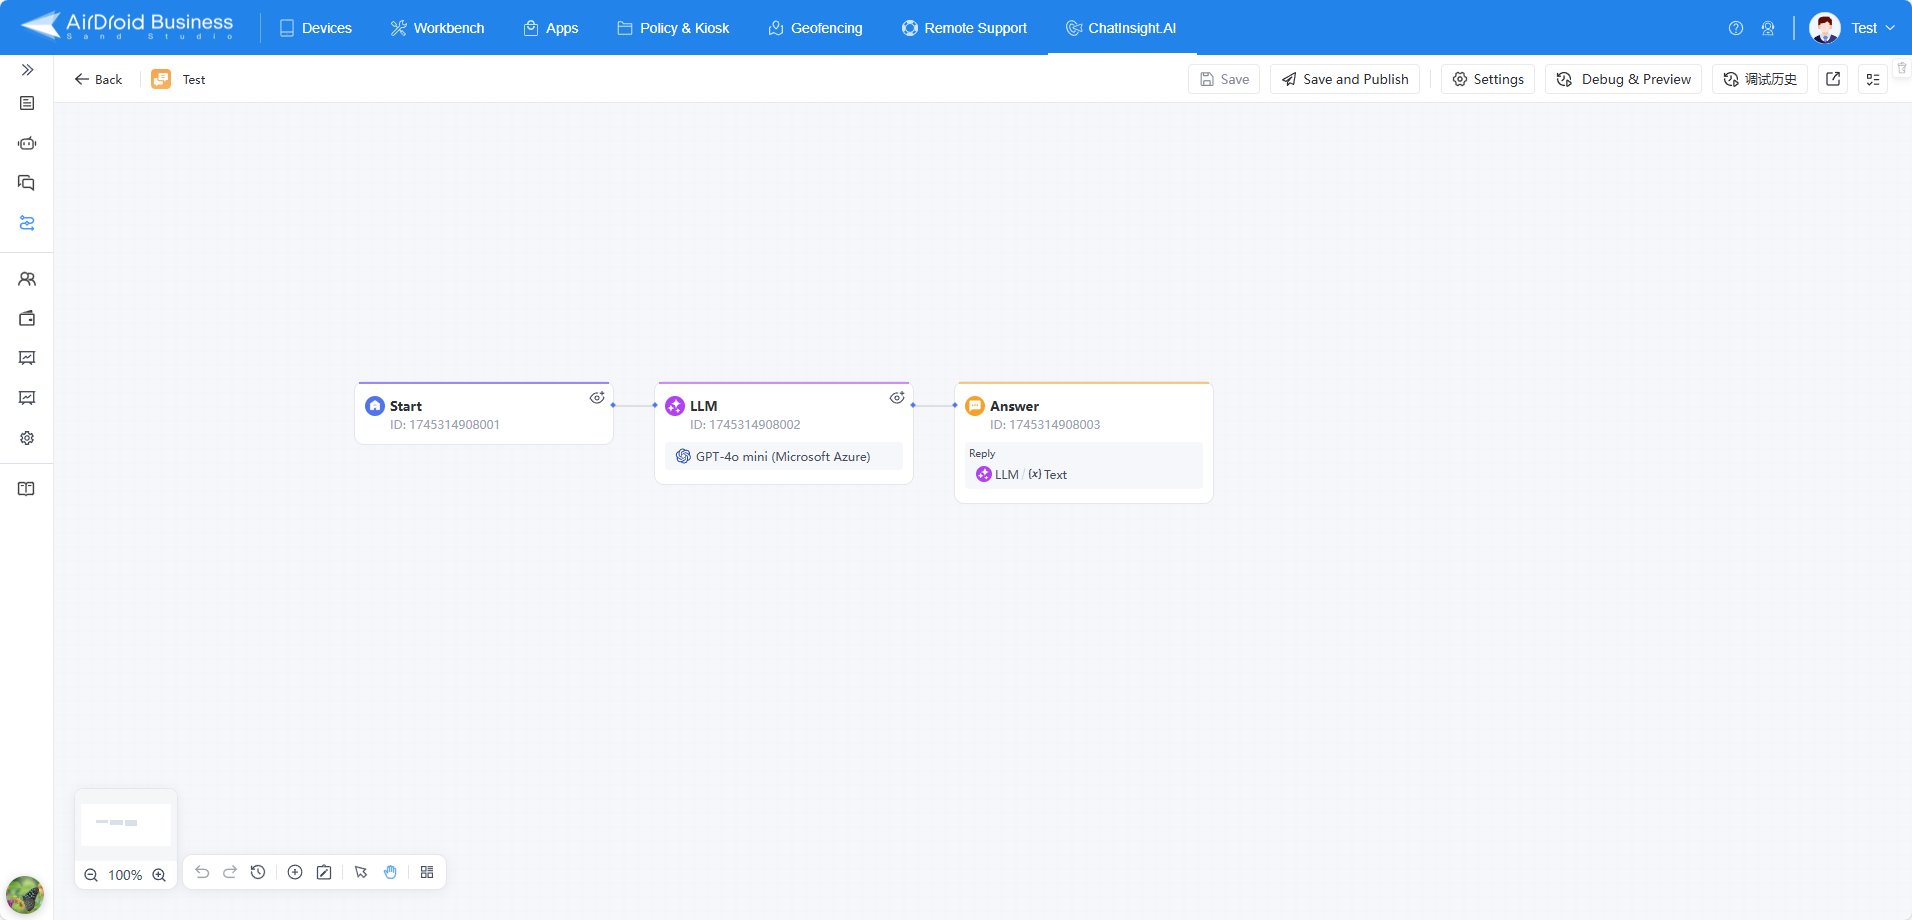
Workflow Building Page Overview
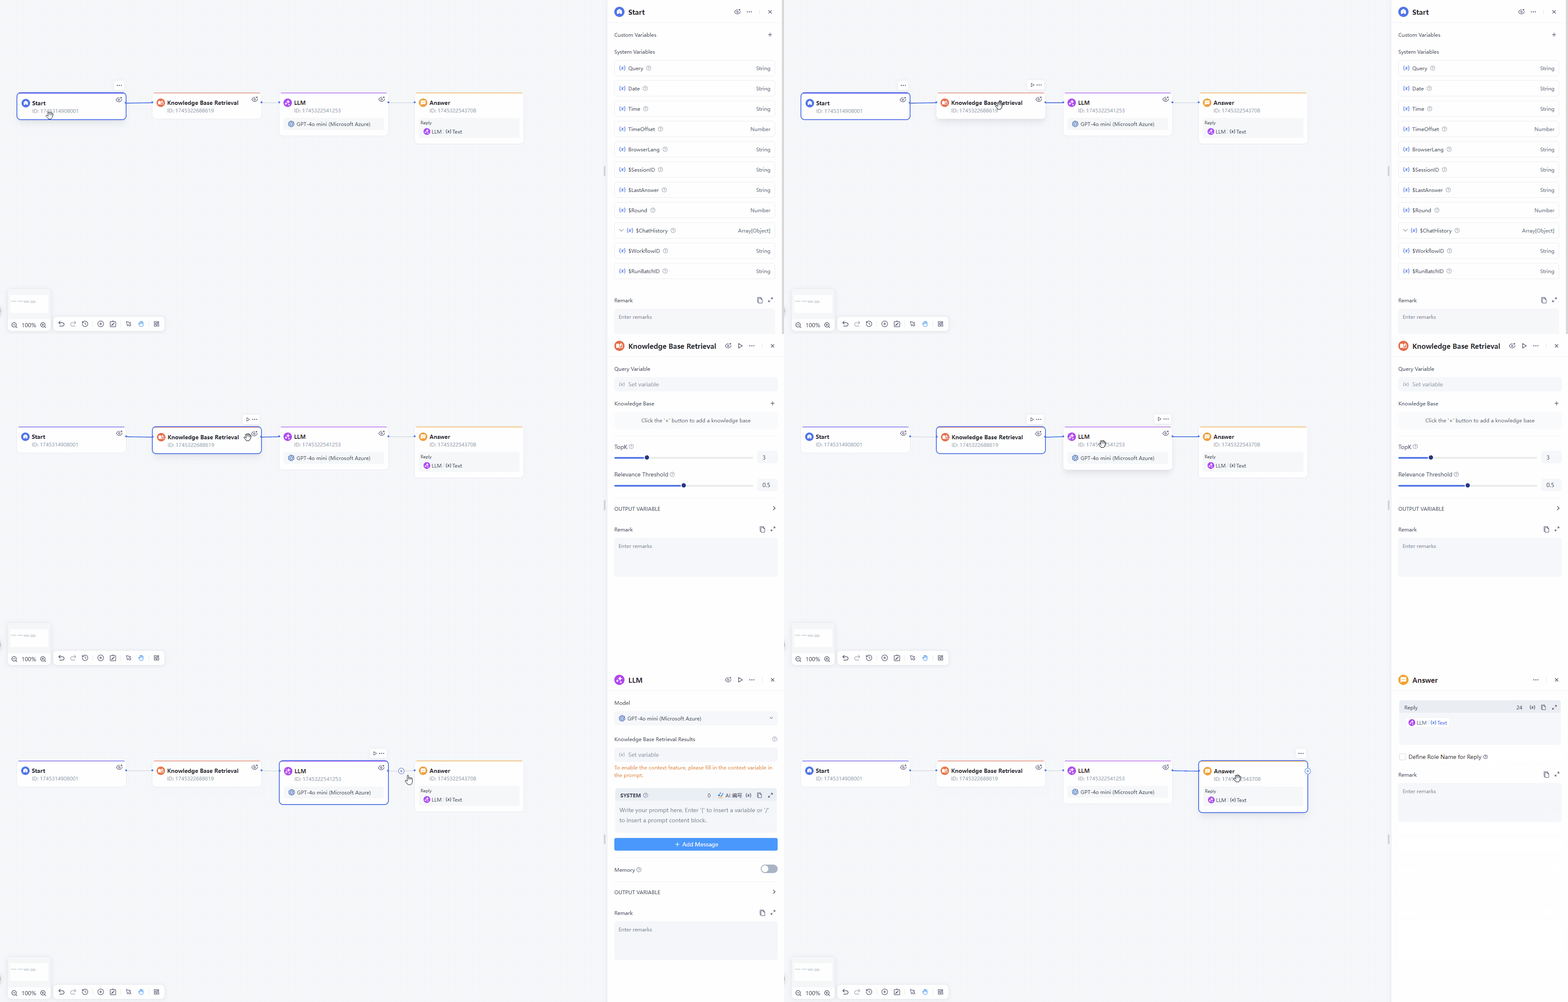
1) Workflow Canvas
The workflow canvas graphically displays nodes and their connections, making it easy to understand the overall structure and data flow of the workflow. You can drag and drop different nodes onto this area to build your workflow.
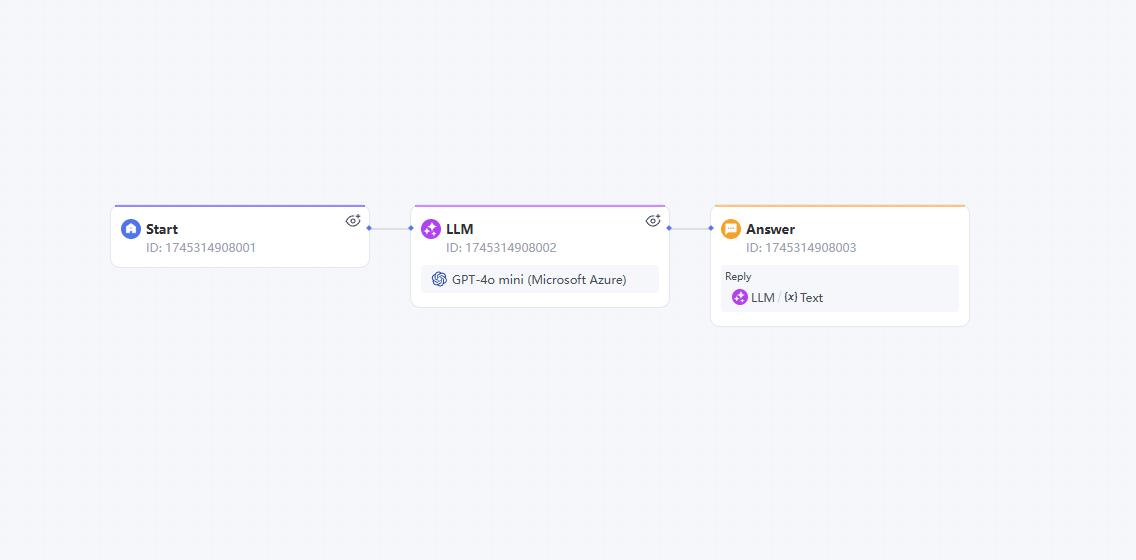
- Node Dragging: In hand mode, drag the canvas to move the view and easily browse different nodes and connections.
- Node Operations:Drag and drop different node types onto the canvas—such as LLM nodes or knowledge base retrieval nodes—to quickly build your workflow. Connect nodes with connector lines to define execution order and logical relationships.
- To connect two nodes, press and hold the
+connector button on the first node, then drag the connector line to the next node.
- To connect two nodes, press and hold the
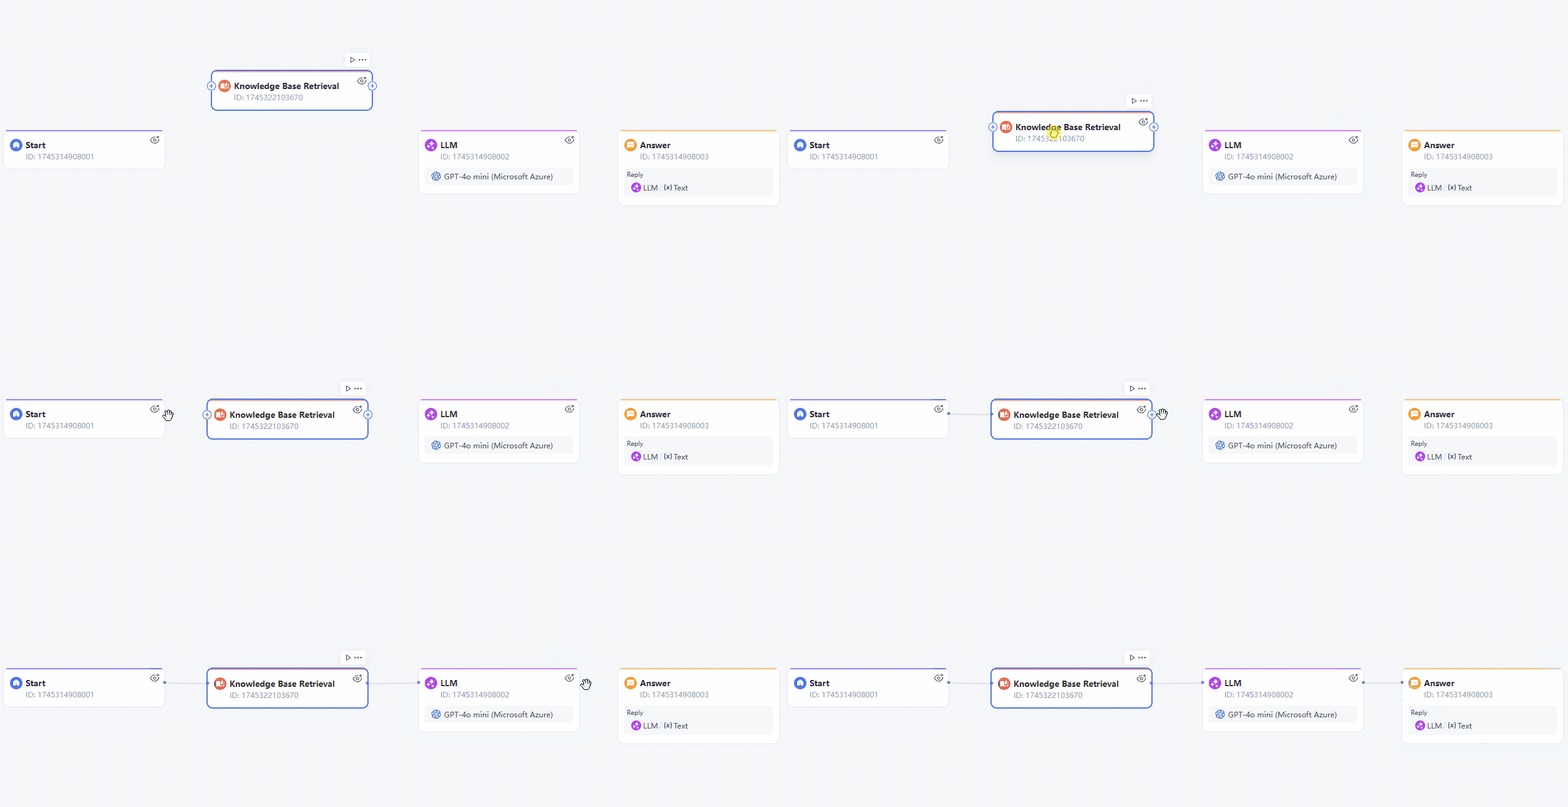
- You can also click a node's
+connector button to add a node, tool, or service. - Node Configuration: Click any node to open its settings panel on the right. Here, you can configure the node's specific parameters, such as input fields and keyword lists, to fit your workflow's needs.
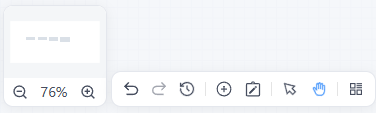
- Canvas Zoom: The workflow canvas supports zooming in and out, making it easier to work with complex workflows.
- Zoom in/out: Adjust the workflow canvas view. A workflow thumbnail is also displayed above the zoom buttons.
- Undo: Revert recent actions to easily correct mistakes or return to a previous state.
- Redo: Reapply undone actions. If you undo an action and change your mind, use redo to quickly restore it, making adjustments easier during design.
- Change History: Your edits are tracked and saved locally on your device. This history clears once you exit the editor.
- Add Node:You can add:
- Basic workflow nodes.
- Tools: Includes GoInsight.AI's built-in tools and custom cloud tools.
- Services: Once you publish a service-oriented workflow as a service, you can insert it directly into other workflows.
- Add Note: Add notes and customize the background color, font size, bold text, or insert links.
- Pointer Mode: Switch to this mode to precisely select and click nodes. It is ideal for selecting, connecting, and configuring nodes, ensuring quick and accurate workflow editing.
- Hand Mode: Switch to this mode to drag and move the canvas. This makes it easier to view and manage large workflows. You can pan the canvas to view different nodes and connections without accidentally selecting or editing them.
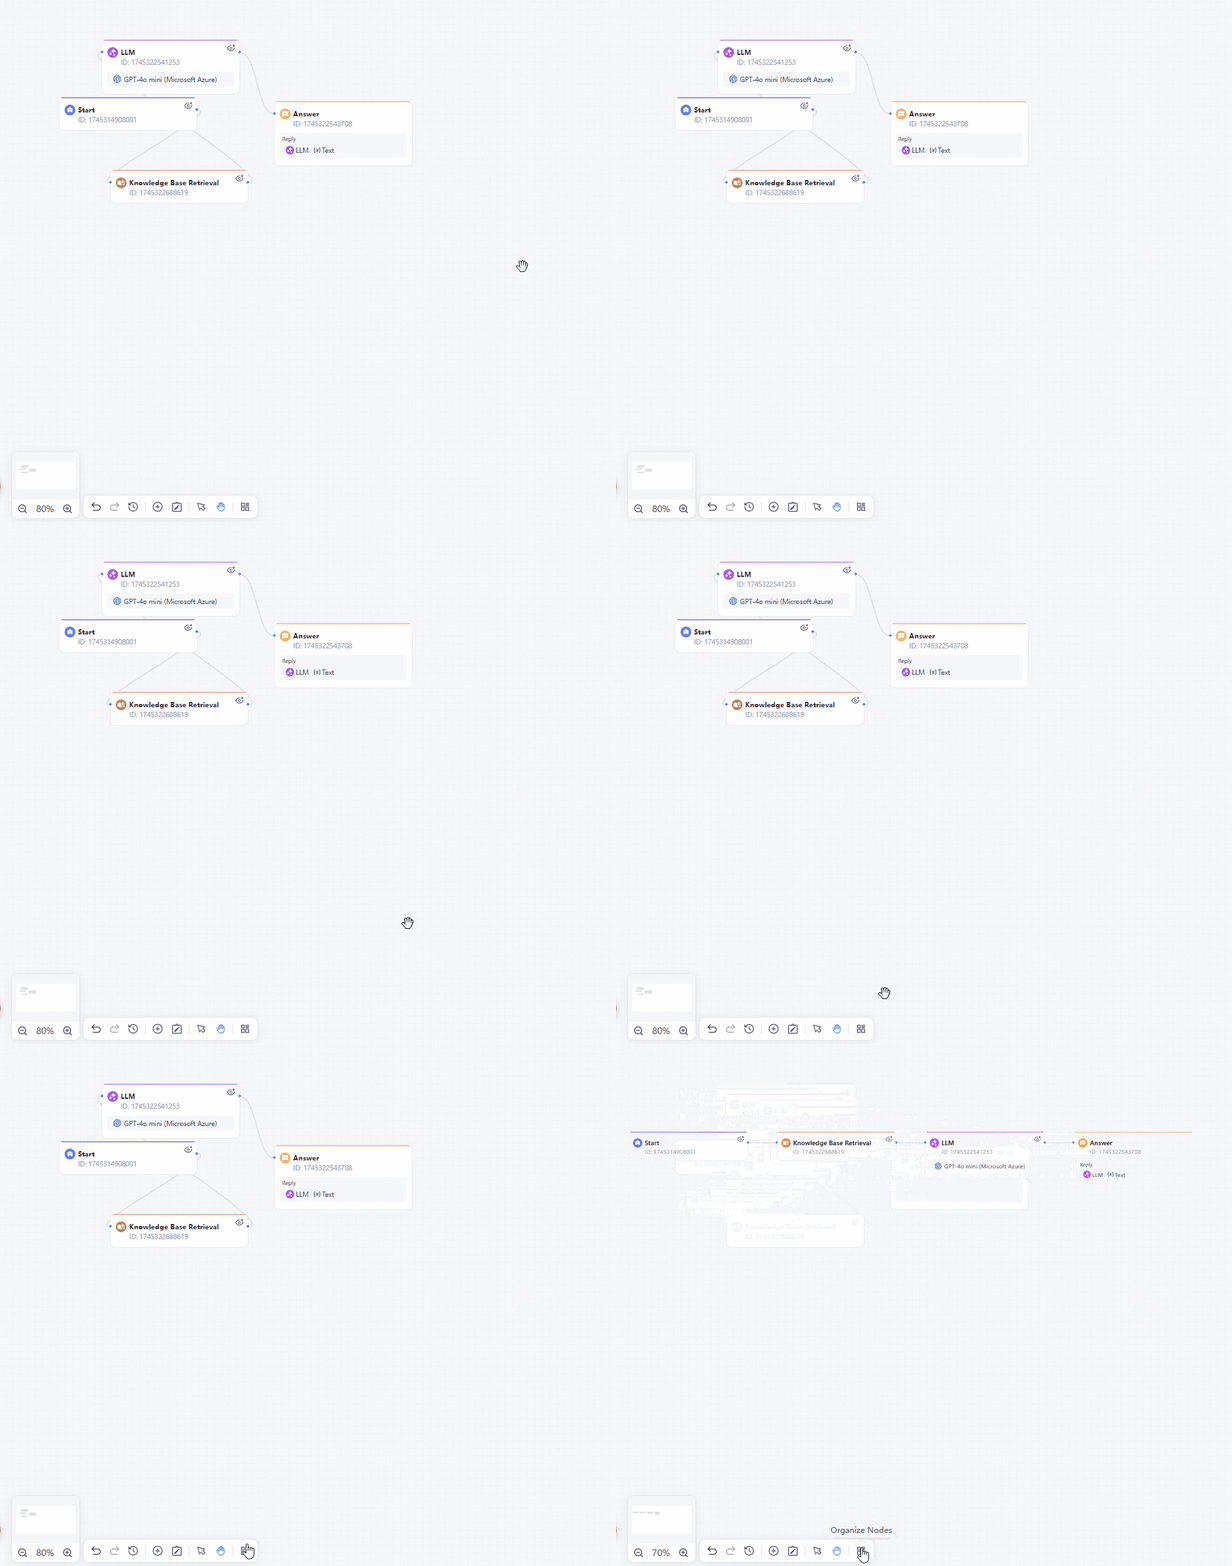
- Arrange Nodes: Automatically organize the nodes and adjust the canvas size.
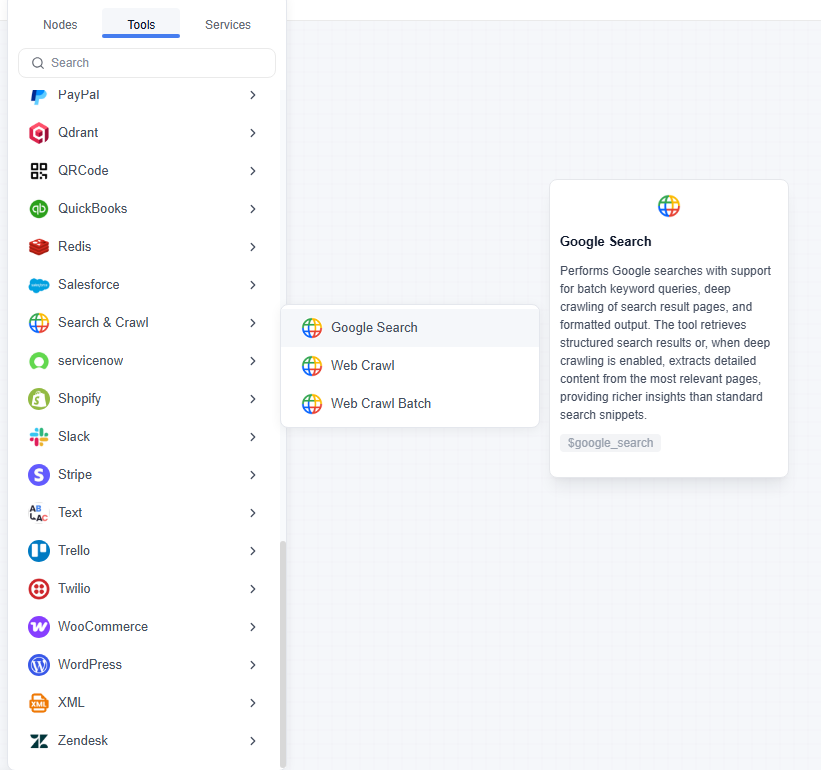
- Besides basic nodes, GoInsight offers powerful built-in tools and allows users to create custom tools to meet different business needs.
- For more details, refer to:
- Click a target node to enter its configuration interface, where you can:
- Define node execution logic and data processing rules.
- Set input and output parameter mappings.
- Debug built-in functions and business algorithms.
- The system provides real-time validation to automatically check parameter compliance during configuration.
- To edit and debug an interactive workflow, refer to: Editing and Debugging Interactive Flow
- To edit and debug a service-oriented workflow, refer to: Editing and Debugging Service Flow
- Trigger execution via @ Workflow / @ Assistant in the Collaboration Workspace.
- Browse, search, and initiate use in Explore AI.
- Publish it as a service, allowing other members of your organization to directly import and call it within the workflow canvas. See: Publishing a Service Flow as a Service
- Set the scheduled execution time for the service-oriented workflow: Triggering a Service flow
- For interactive flows, refer to:
- For service flows, refer to:
- 1.Start Node
- No need to add any custom variable, just use the system variable Query (the question asked by the user).
- 2.Code Node
- The function of this node is to calculate a time range, otherwise there will be a huge amount of data when the HTTP Request node fetches information. Here we take the 30th day before the day entered by the user as an example.
- Input Variables: This node does not require any input variables.
- Python: Here is a code example to calculate the 30 days range, you can copy and paste it to the block.
- Output Variables:
● from_date
● report_date
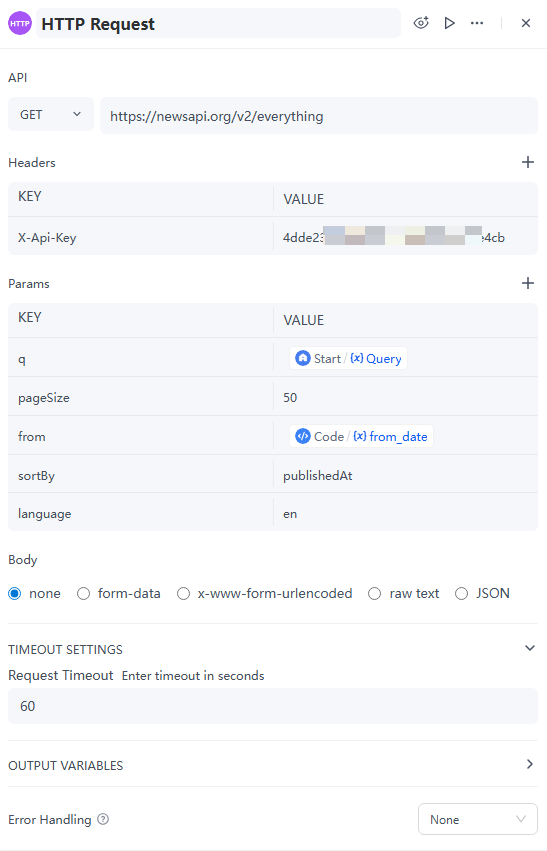
- 3.HTTP Request Node
- The function of this node is to obtain data from a specific data source, which can be from the subscribed RSS feeds or the API of some websites.

- You can also directly replace this node with our system built-in system tools, such as Google search.
- Here we take the NewsAPI as an example to get the latest industry news.
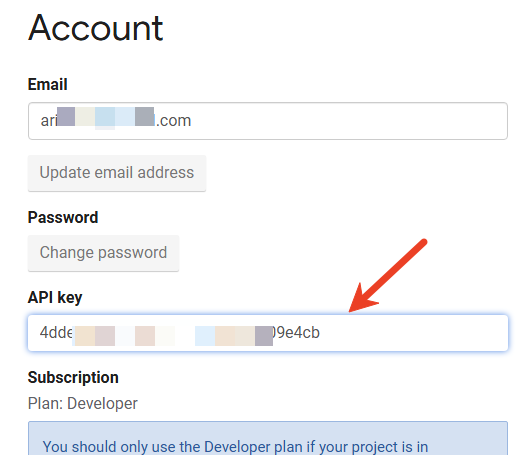
- First, register to get API Key: https://newsapi.org/. After you click the "Get API Key", you will find the API key on the page. Please copy and keep it, we will need it later.
- Back to the GoInsight.AI's InsightFlow canvas, and fill it out with the configuration below.
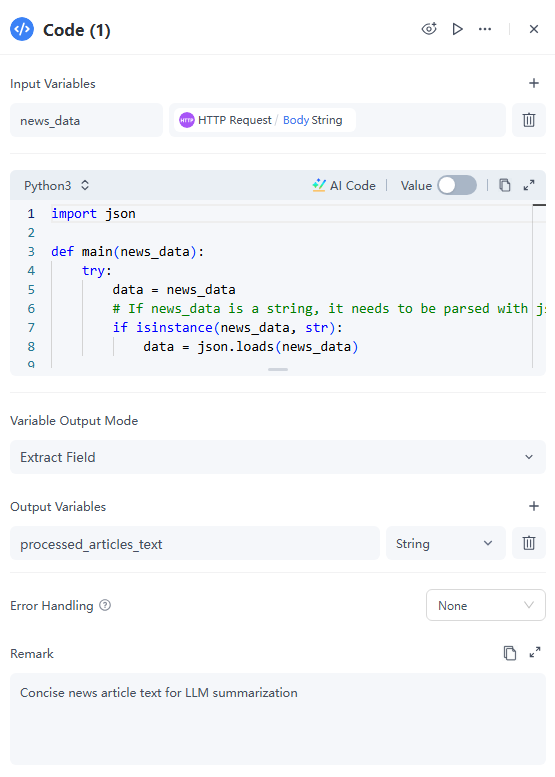
- 4.Code Node
- The function of this node is to pre-process the raw news data returned by the API, such as filtering key fields and merging text, to prepare for LLM summarization.
- Input Variables: Variable name set as news_data, the value is filled into the output of the previous node, that is {{HTTP_Request.Body}}.
- Python: The following is an example:
- Output Variable: Set one output variable: processed_articles_text, and is "String".
- 5.LLM Node
- This node is to generate the insight report with summaries and link, following the system role and instructions.
- Model: Here we choose Azure GPT-4.1 mini.
- SYSTEM: This is the "role setting", which is a prompt instruction to the LLM, also known as prompt. It is the key to whether the workflow can work as you expect. In order to make LLM better understand, try to structure the content as much as possible. The following is an example:
- USER: Provide instructions, queries, or any text-based input to the model. Here is an example:
- 6.Answer Node
- Reply:Set as the output variable Text of the previous step LLM node
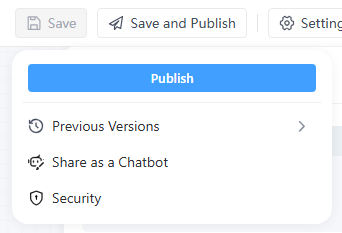
- On the workflow canvas , click "Save and Publish" to publish the workflow.
- Under "Save and Publish", you can do more with the workflow: you can check previous published versions, share the workflow as a robot and set up security.
- Trigger execution via @ Workflow / @ Assistant in the Collaboration Workspace.
- Browse, search, and initiate use in Explore AI.
- Publish it as a service, allowing other members of your organization to directly import and call it within the workflow canvas. See: Publishing a Service Flow as a Service
- Set the scheduled execution time for the service-oriented workflow: Triggering a Service flow
- For interactive flows, refer to:
- For service flows, refer to:
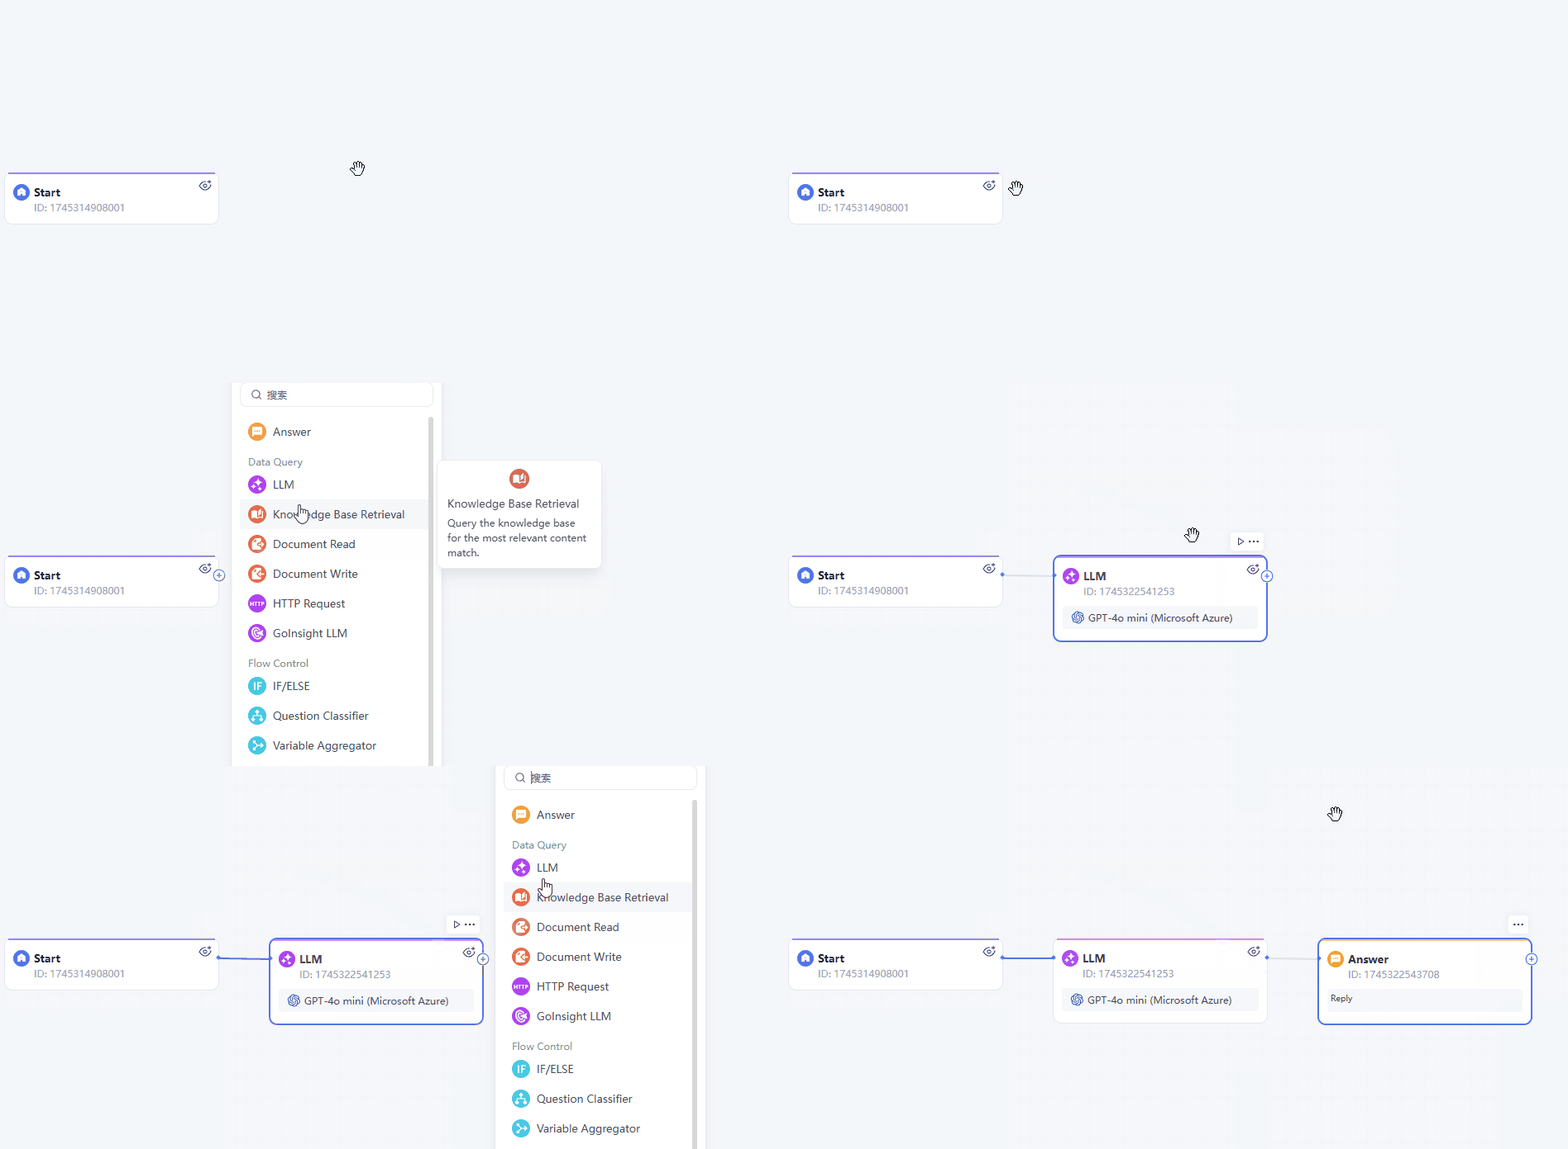
This also works when inserting a node, tool, or service between two already connected nodes.
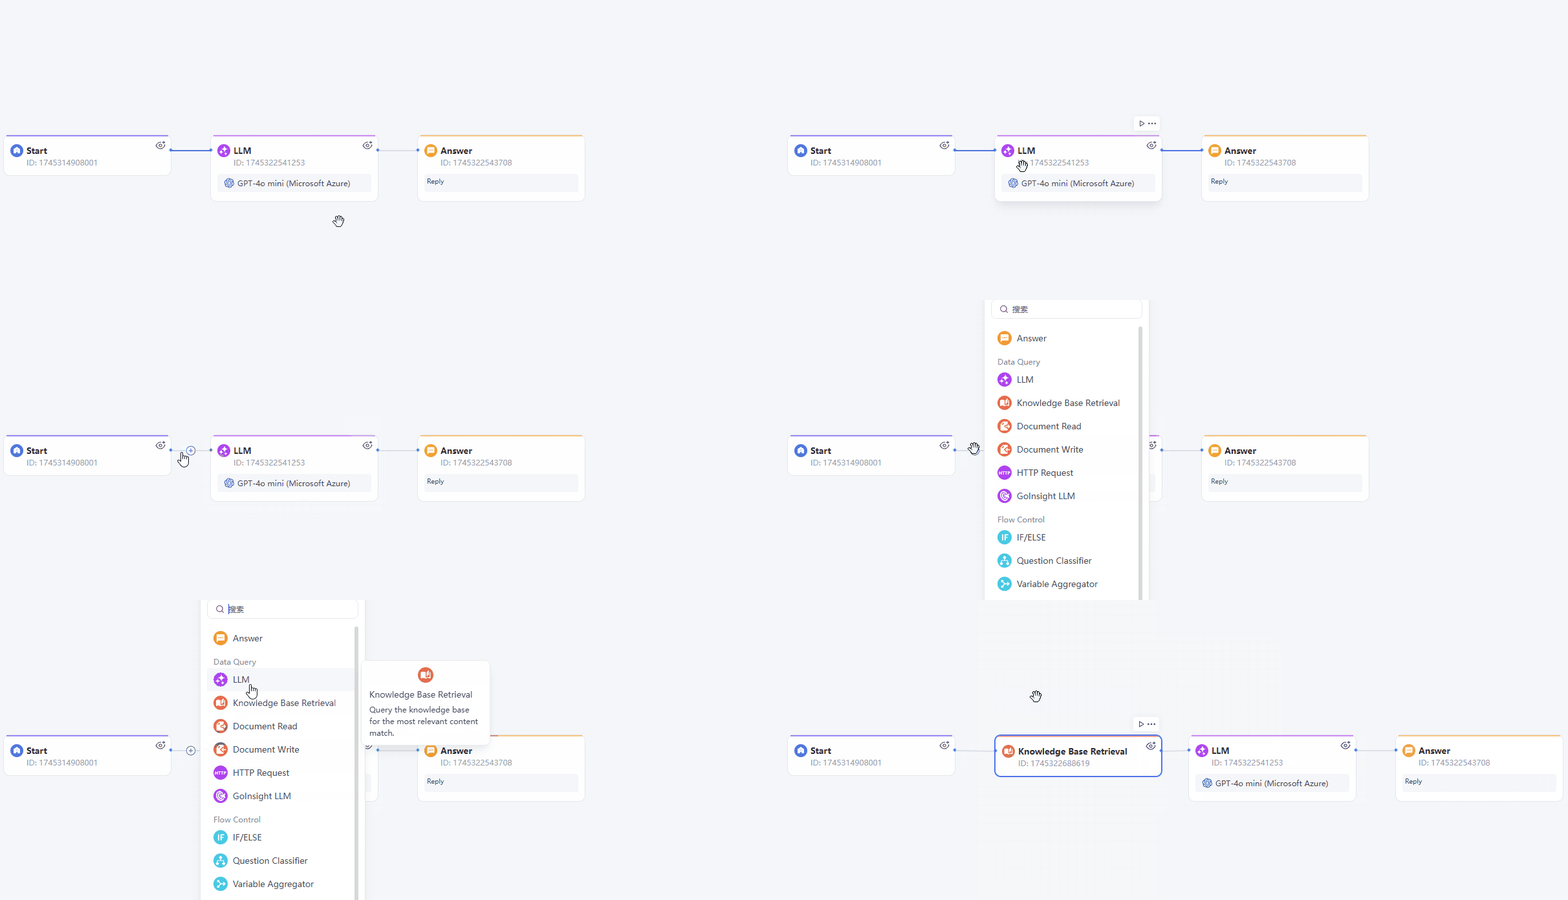
2) Toolbar
Adding and Debugging Nodes
1) Adding Required Nodes
After creating a workflow, you can add nodes as needed. GoInsight supports flexible combinations of multiple node types to handle full-cycle orchestration, from data collection to business decisions.
2) Editing and Configuring Nodes
Click an added node to edit and configure it. Each node has specific functions that you can adjust to meet your requirements.
Editing and Debugging Workflows
Once you have orchestrated the workflow and configured the nodes, you can debug the entire process. Run a simulation to ensure the results meet your expectations. The debug results show the execution path of the workflow and the operating details of each node.
Step 3: Publishing Workflows
Once you finish debugging and confirm the workflow runs as expected, click Save and Share in the menu bar to publish it.
1) Publishing Internally
Once published, team members can find and use the workflow in the GoInsight Workspace through the following methods:
For service-oriented workflows, you can also:
2) Sharing Externally
If you want to share the workflow externally:
Build Your First Simple Workflow
Whether you have programming experience or not, you can quickly build an AI Agent on the GoInsight.AI platform. GoInsight.AI provides one-click deployable AI Agent templates that you can use as needed.
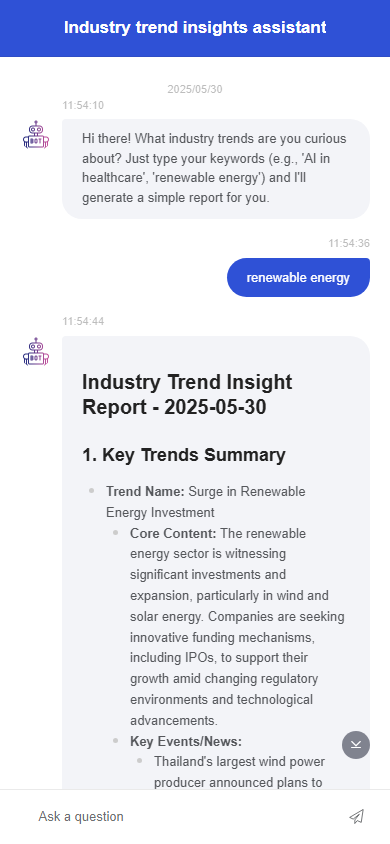
If you prefer a hands-on approach, follow along as we demonstrate with the "Industry Trend Insight Assistant" example.
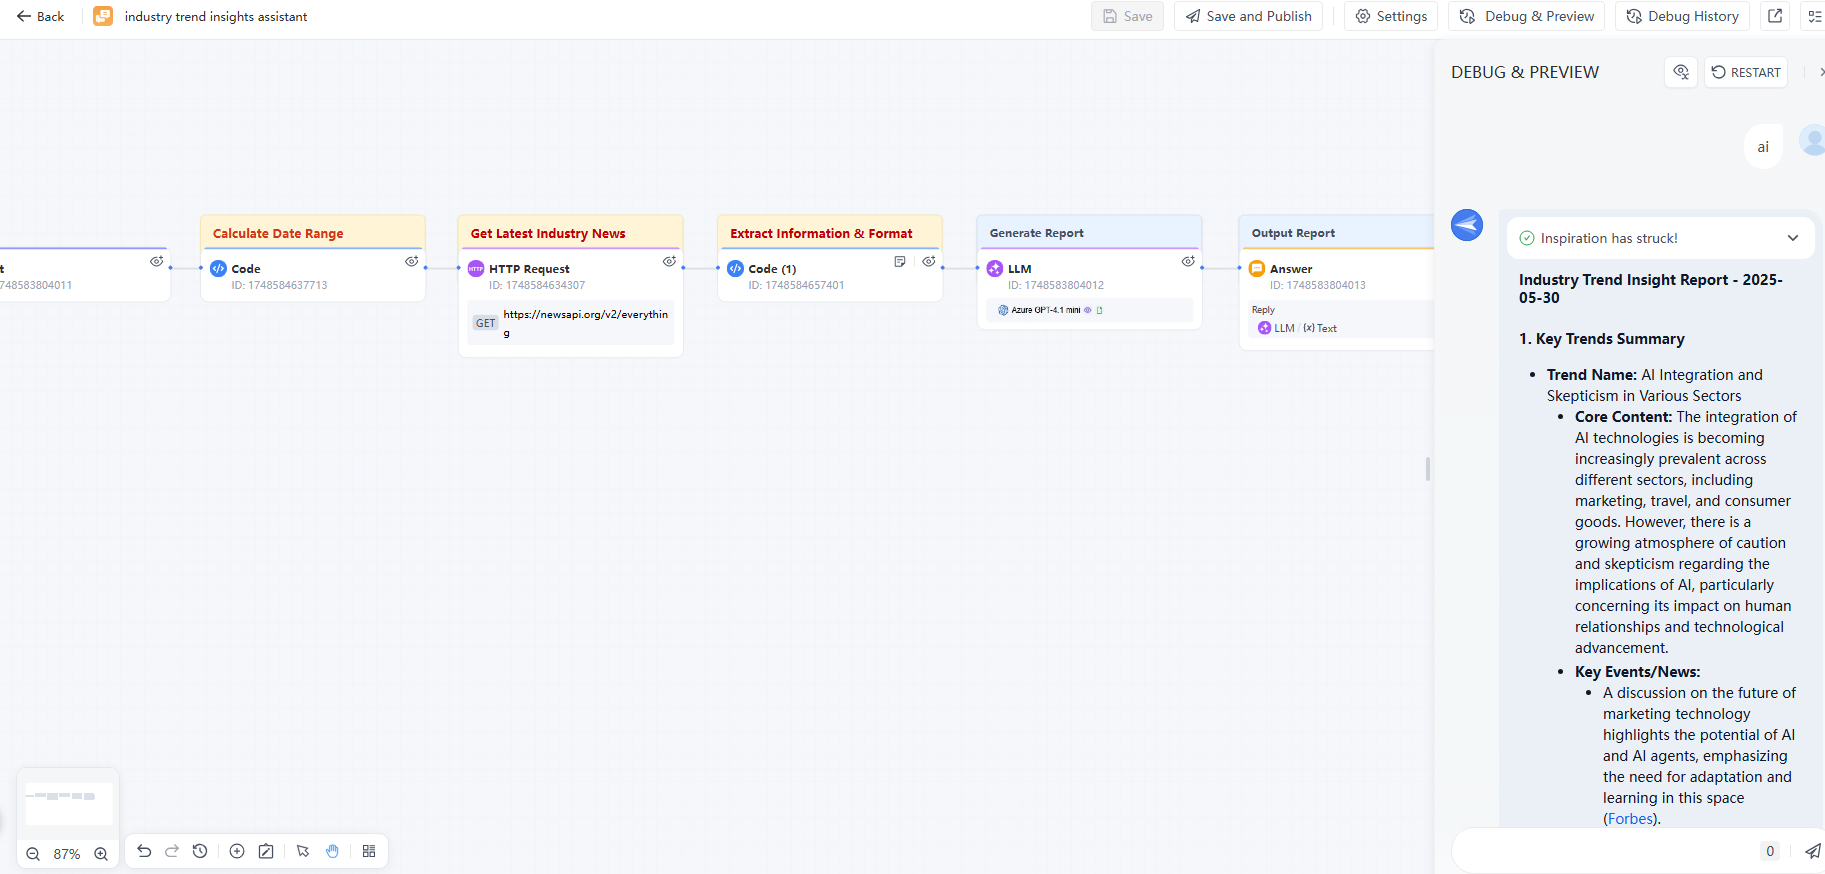
Based on the industry keywords entered by you, it will quickly summarize a simple industry market insight for you. The final effect of the AI agent be like:
The Workflow design overview:

Follow the below detailed steps to quickly build.
Step 1. Create A Workflow
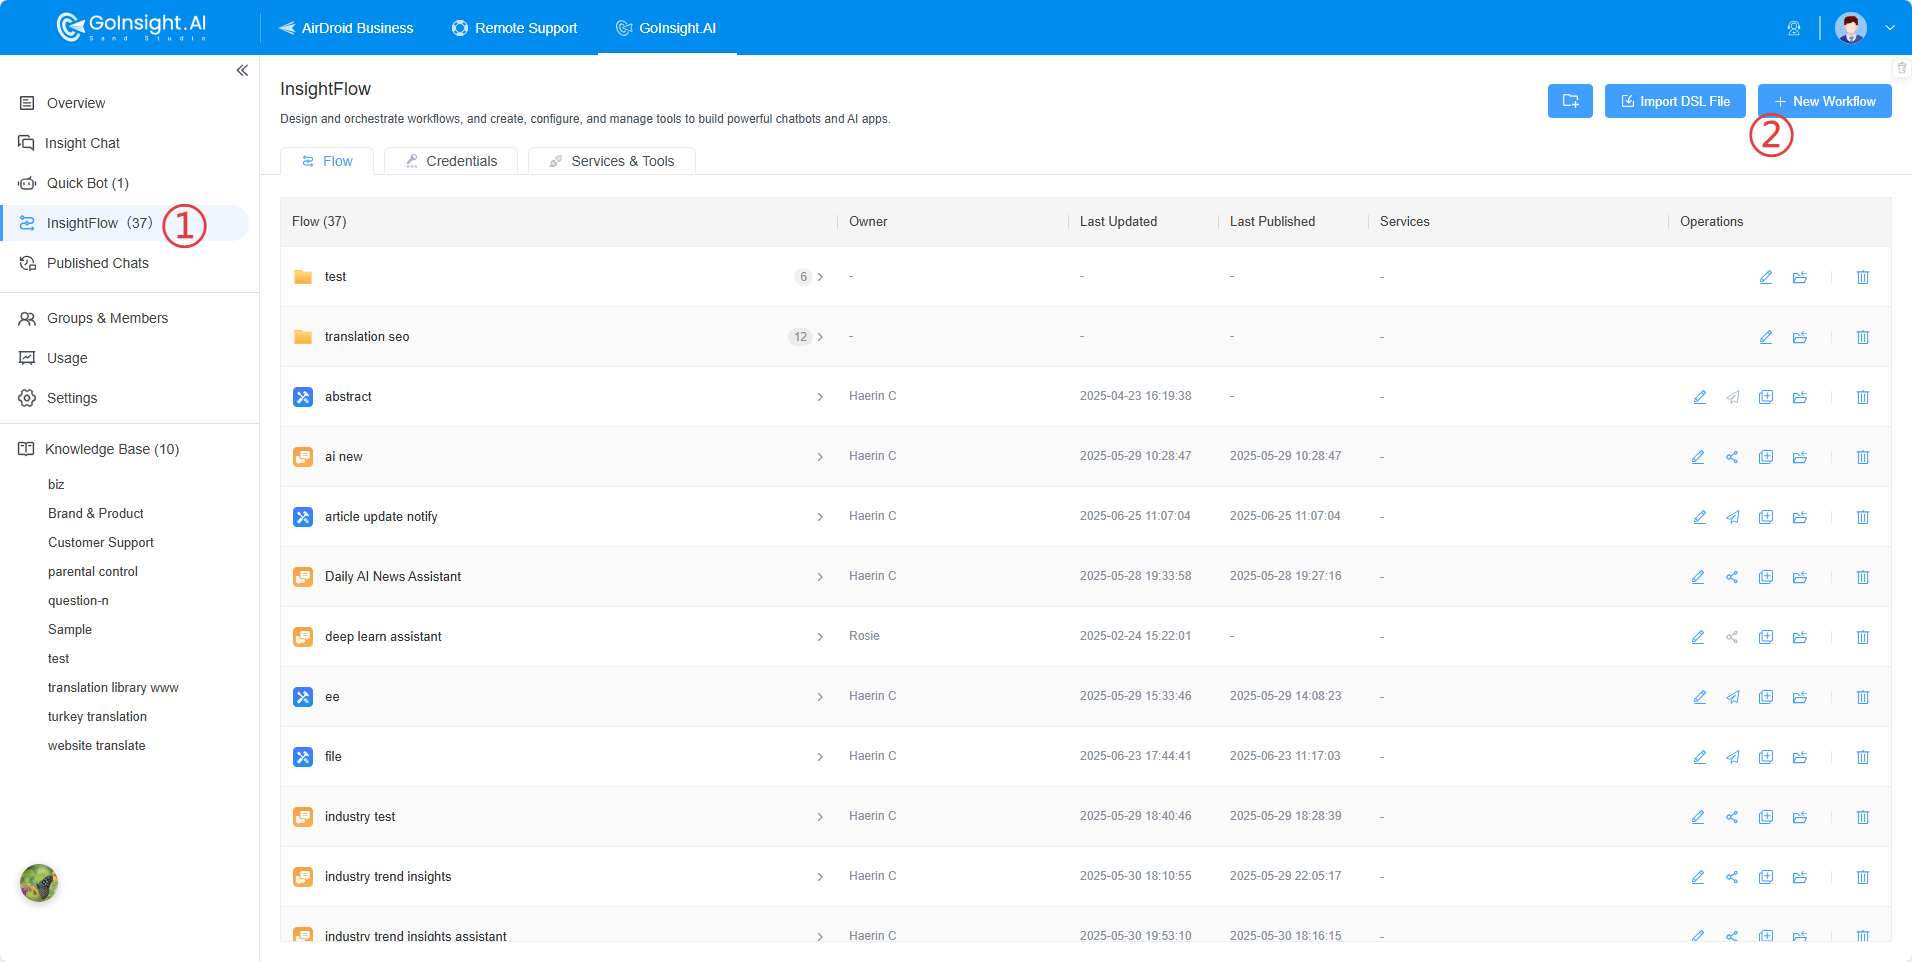
1. On the left navigation bar, select "InsightFlow" and then click "+ New Workflow" in the upper right corner.
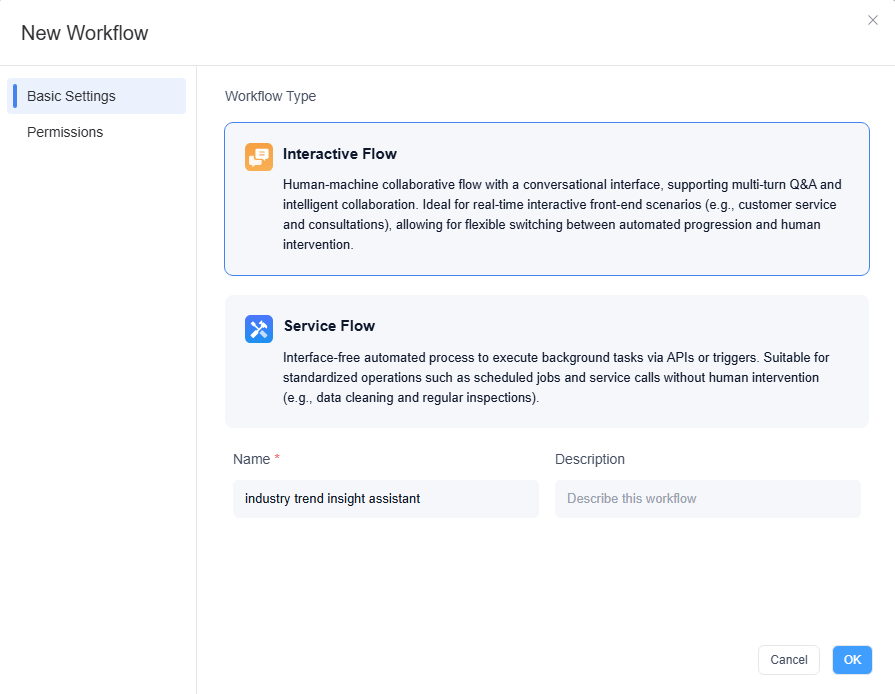
2. Select the workflow type "Interactive Flow" and name it.
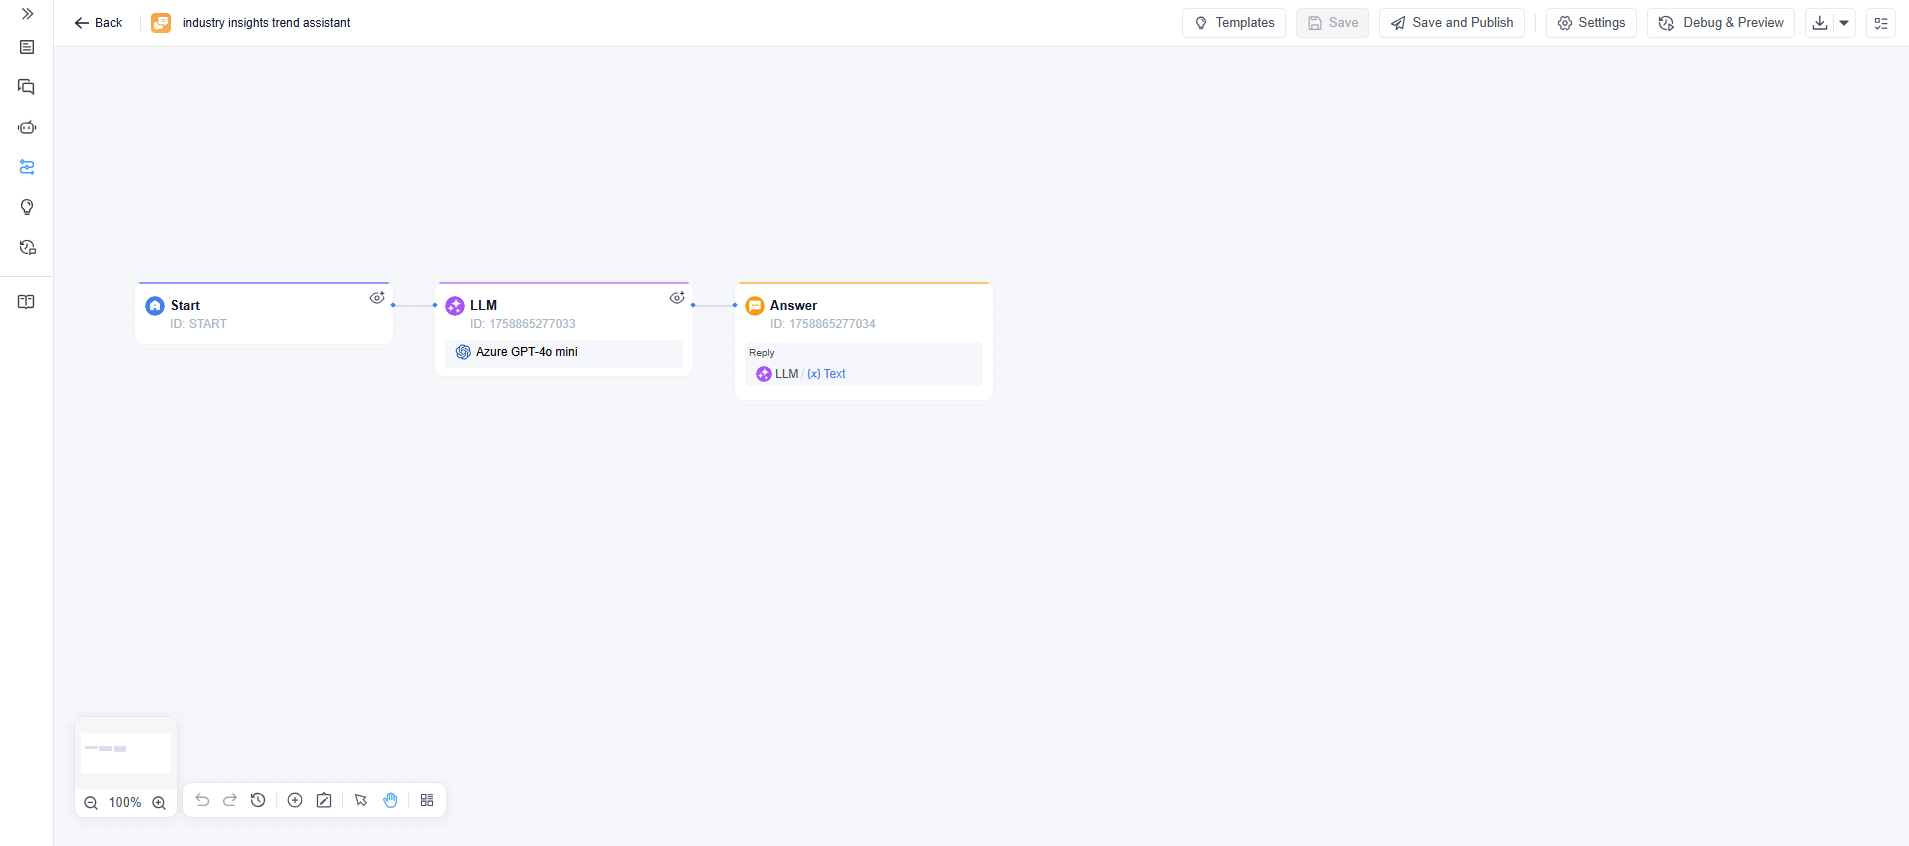
3. After clicking "OK", you will be directly directed to the workflow canvas.
According to the disassembly idea we mentioned earlier, we will need to add a HTTP Request node and two Code nodes before the LLM node. Check the figure below for details. We have annotated the main functions of each node above for your better understanding.

Step 2. Configure Workflow
The following are the details for configuring each node:
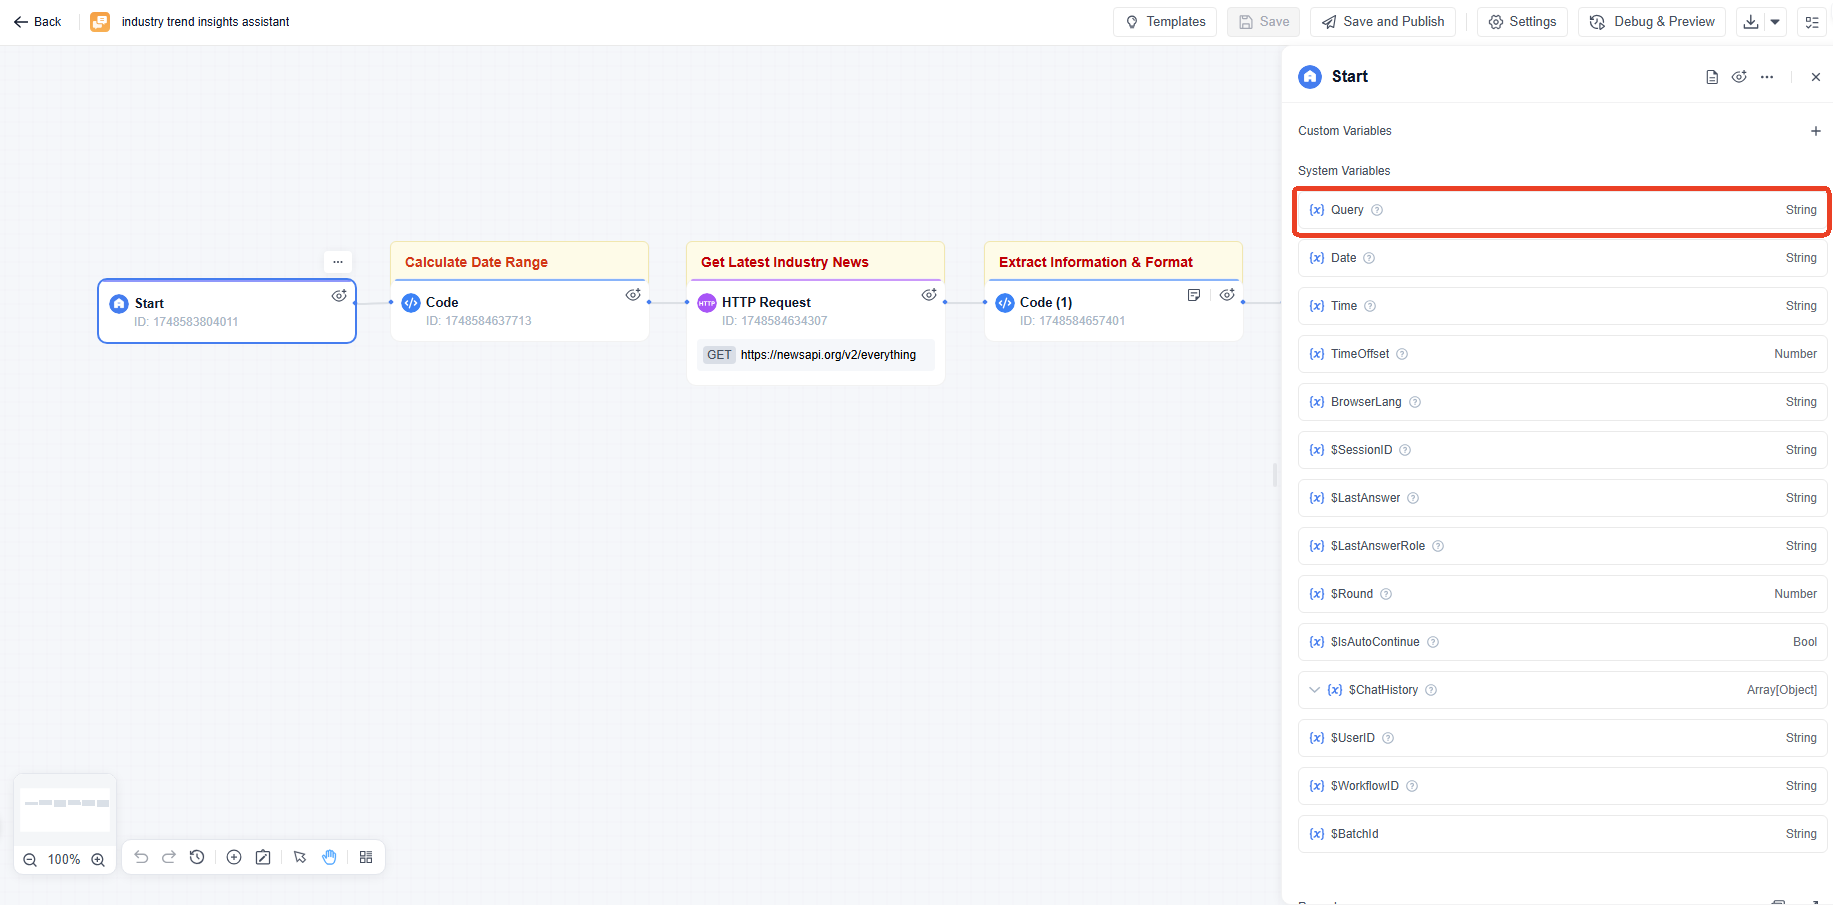
To learn more about variables and their usage, please click here.
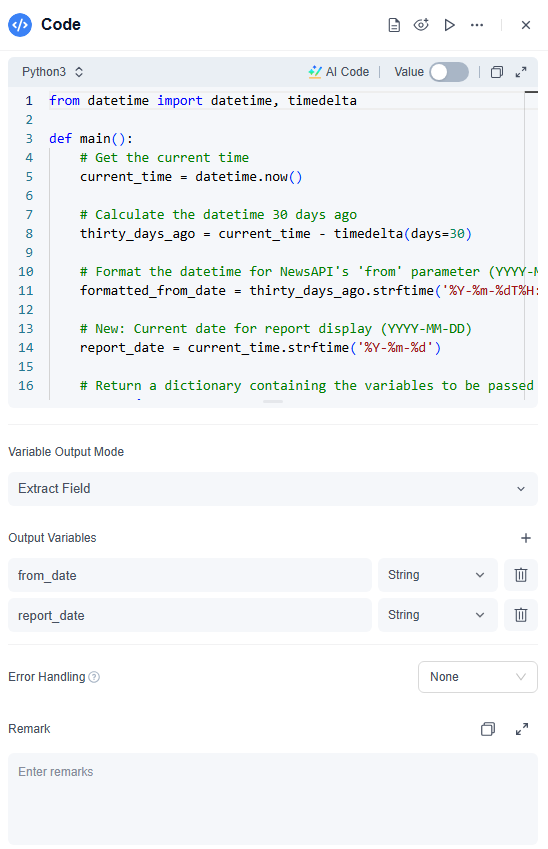
from datetime import datetime, timedelta

def main():
    # Get the current time
    current_time = datetime.now()

    # Calculate the datetime 30 days ago
    thirty_days_ago = current_time - timedelta(days=30)

    # Format the datetime for NewsAPI's 'from' parameter (YYYY-MM-DDTHH:MM:SS)
    formatted_from_date = thirty_days_ago.strftime('%Y-%m-%dT%H:%M:%S')

    # New: Current date for report display (YYYY-MM-DD)
    report_date = current_time.strftime('%Y-%m-%d')

    # Return a dictionary containing the variables to be passed to the next nodes
    return {
        "from_date": formatted_from_date,  # Output variable for NewsAPI's 'from' parameter
        "report_date": report_date         # Output variable for the report's current date
    }
If you need a different time range, feel free to change the "days=30" or "thirty_days_ago" fields, but keep them consistent everywhere.
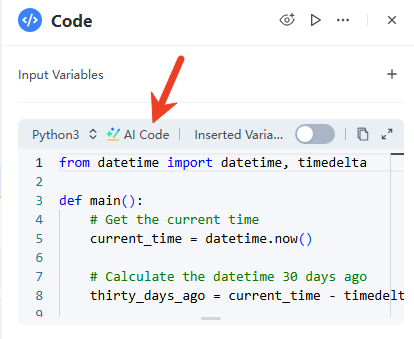
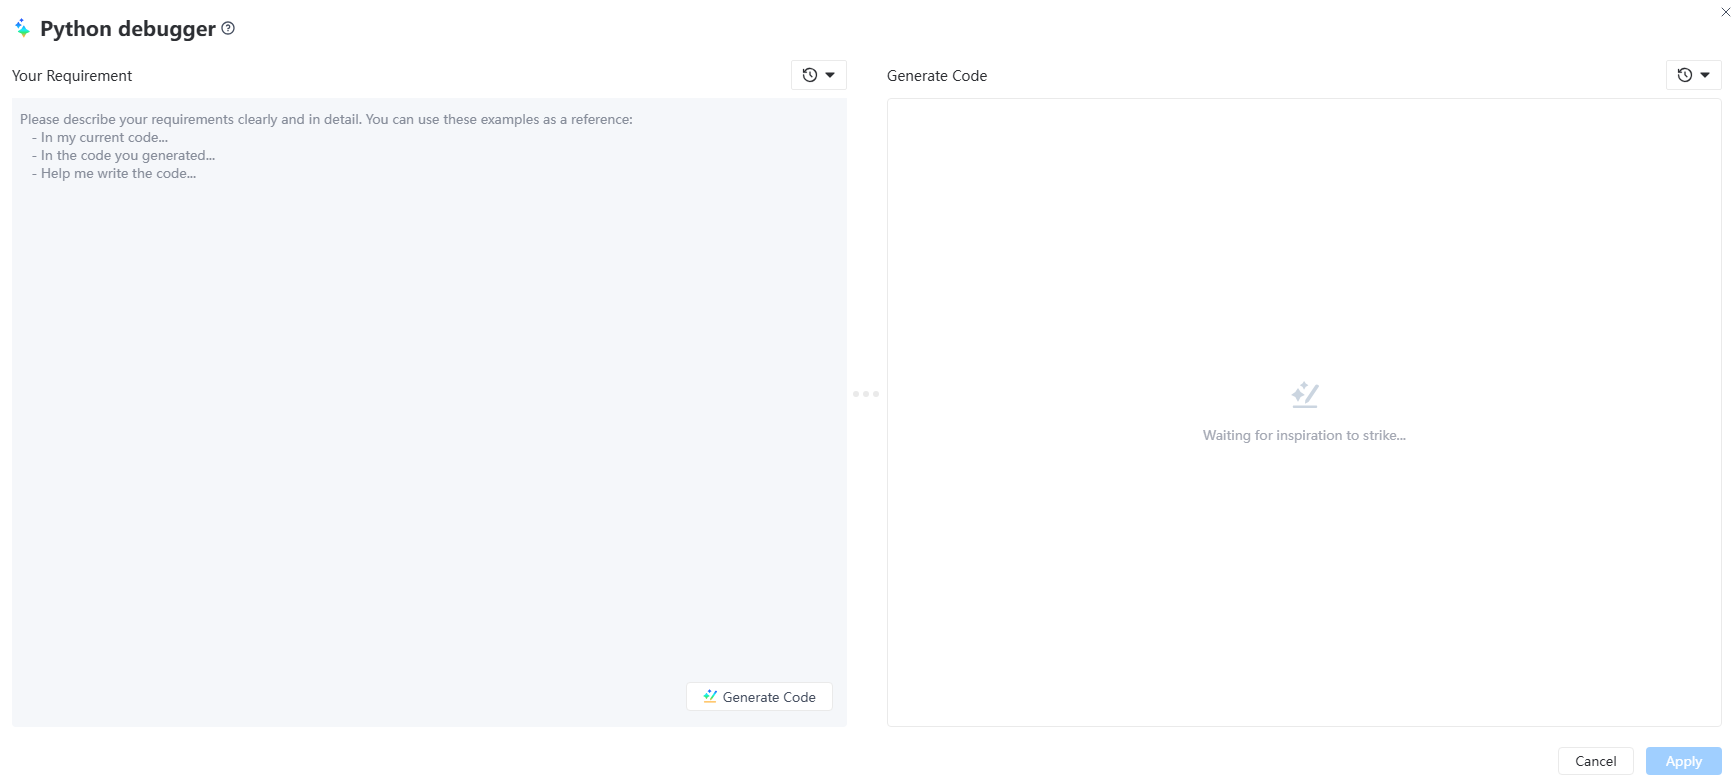
It doesn’t matter if you are not familiar with coding. Click the AI Code, tell AI your needs, and AI will automatically output the code that meets your needs.
All are "String".
| Field | Configure Content | Purpose |
|---|---|---|
API Method | GET | HTTP method. |
API URL | https://newsapi.org/v2/everything | NewsAPI's universal news search endpoint. |
Headers | KEY: X-Api-Key VALUE: Your NewsAPI API Key | NewsAPI authentication required API Key. |
Params | KEY: query VALUE: {{Start.query}} KEY: language VALUE: en KEY: sortBy VALUE: publishedAt KEY: pageSize VALUE: 50 KEY: from VALUE:{{Code.from_date}} | Query parameters, defining keywords, language, sort order, quantity, and time range for the search. |
Body | none | GET requests do not require a request body. |
Request Timeout | 60 | Set request timeout. |
Output Variable | news_api_response | Stores the API response in a variable named news_api_response for subsequent use. |
import json

def main(news_data):
    try:
        data = news_data
        # If news_data is a string, it needs to be parsed with json.loads()
        if isinstance(news_data, str):
            data = json.loads(news_data)

    except json.JSONDecodeError:
        # If parsing fails, return a specific error message
        return {"processed_articles_text": "Error: Could not parse news data as JSON."}
    except TypeError:
        # If news_data is not valid (e.g., None), return an error
        return {"processed_articles_text": "Error: news_data is not valid."}

    processed_articles = []
    # Check if 'articles' key exists and its value is a list (this is NewsAPI's structure)
    if data and 'articles' in data and isinstance(data['articles'], list):
        for article in data['articles']:
            title = article.get('title', '')
            description = article.get('description', '')
            url = article.get('url', '') # Ensure URL is extracted

            # Filter out articles with empty titles or descriptions to ensure meaningful content for the LLM
            # Ensure URL is also present, as it's useful for the report
            if title and description and url:
                # IMPORTANT CHANGE HERE: Include the link in a Markdown link format
                # LLMs generally understand and preserve this format well.
                combined_text = f"Title: {title}\nDescription: {description}\n[Source Link]({url})"
                processed_articles.append(combined_text)

    if not processed_articles:
        return {"processed_articles_text": "No valid articles found after processing NewsAPI response."}

    # Concatenate the processed articles into a single string, separated by a distinct delimiter.
    # Limit the number of articles (e.g., top 20) to prevent the LLM input from becoming too long.
return {"processed_articles_text": "\n\n---\n\n".join(processed_articles[:20])} 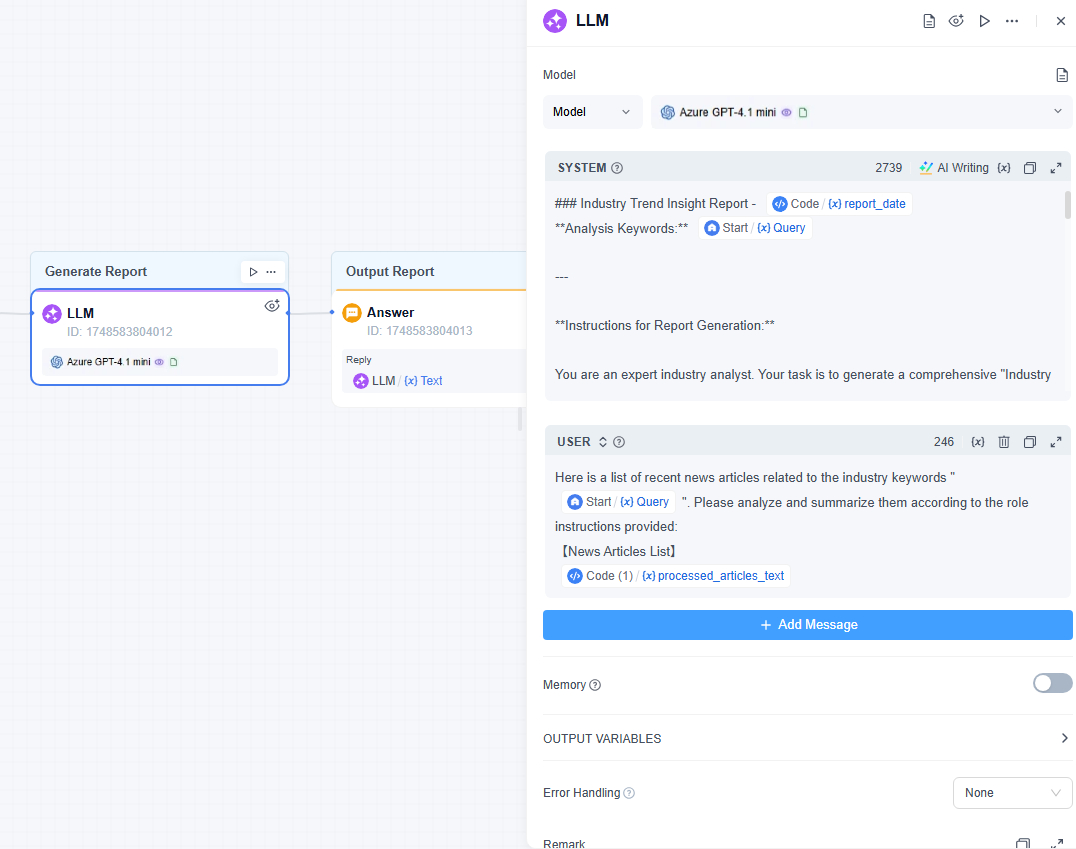
### Industry Trend Insight Report - {{Code.report_date}}
**Analysis Keywords:** {{Start.Query}}

---

**Instructions for Report Generation:**

You are an expert industry analyst. Your task is to generate a comprehensive "Industry Trend Insight Report" based on the provided news articles. Adhere strictly to the following structure and guidelines:

**Output Structure:**

#### 1. Key Trends Summary
- **Trend Name:** [Identify a concise trend name]
  - **Core Content:** [Summarize the main content of the trend based on the articles. Ensure this is direct and informative.]
  - **Key Events/News:** [Mention specific events or news items that support this trend. **For each event/news mention, if a source link is available within the provided articles (e.g., "[Source Link](URL)"), incorporate this exact Markdown link directly into the report after the relevant detail.**]
  - **Potential Impact:** [Analyze the potential implications or future developments related to this trend.]

#### 2. Key Company/Product Developments
- [Identify specific companies or products mentioned in the news articles that highlight significant developments. **For each company/product development, if a source link is available, include this exact Markdown link.**]

#### 3. Potential Risks & Opportunities
- **Risks:** [Identify potential risks related to the overall industry or trends based on the articles.]
- **Opportunities:** [Identify potential opportunities arising from the trends or developments.]

**Important Guidelines:**

* **Data Source:** All information, analyses, and summaries must be strictly derived from the `【News Articles List】` provided below.
* **Source Link Integration:** When extracting `Key Events/News` or `Key Company/Product Developments`, if the original article's text contains a `[Source Link](URL)` format, **you MUST include this exact Markdown link within your report right after the relevant piece of information.** Do not modify the link format or content. If multiple sources support a single point, pick the most relevant one, or include a few if appropriate and concise.
* **Concise and Professional:** The language style should be professional, objective, and the report content should be concise and to the point.
* **English Report:** All content should be output in English.
* **No Fabrication:** Do not invent or fabricate any information not present in the provided articles.
* **Data Sufficiency:** If the provided news articles are insufficient to form a detailed analysis, or if no significant trends can be identified, state this clearly at the end. Otherwise, provide a concluding remark on sufficiency.

---

**【News Articles List】**
{{Code.processed_articles_text}}
Tips: You can also click "AI Writing" to let the AI automatically write or optimize the prompt for you.
Here is a list of recent news articles related to the industry keywords "{{Start.Query}}". Please analyze and summarize them according to the role instructions provided:
【News Articles List】
{{Code(1).processed_articles_text}} 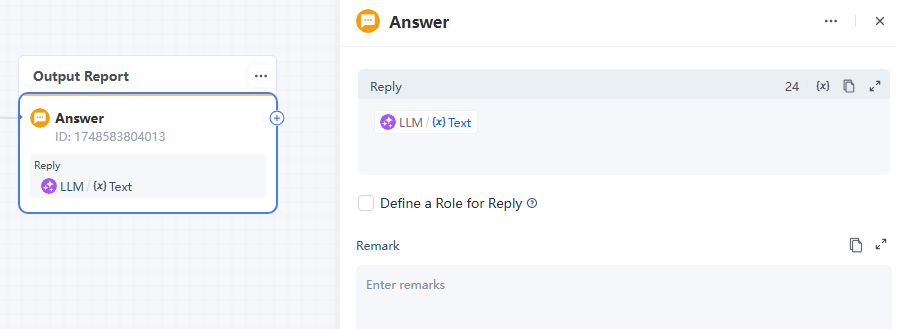
Step 3. Debug and Preview
After completing all configurations, click Save on top of the right, and then click Debug and Preview. You can test whether your workflow meets your expectations in the effect preview area on the right.
Step 4. Publish
After you have debugged the workflow and ensured that it meets your requirements, you can then publish the workflow.
1) Publishing Internally
Once published, team members can find and use the workflow in the GoInsight Workspace through the following methods:
For service-oriented workflows, you can also:
2) Sharing Externally
If you want to share the workflow externally:
Congrats! In just a few minutes, you successfully build your first simple workflow for daily use. You can also learn more and build a more powerful AI Agent!


Leave a Reply.