Definition
The Collaboration Workspace is an advanced conversation mode in GoInsight.AI's Insight Chat. It transforms the "single dialogue" between a user and an AI into an "intelligent project collaboration space". By using the @ symbol, any user can effortlessly invoke authorized AI workflows (Insight Flows) and Quick Bots within the enterprise, even if they were created by other colleagues.
In the Collaboration Workspace, all conversation content is automatically synchronized as context for subsequent workflow invocations, effectively eliminating redundant communication. Users, enterprise colleagues, AI, and workflows co-create within the same space, where information and results are shared automatically. This makes AI intelligence a true "digital colleague" for the team, driving task execution and redefining how we collaborate.
Currently, the Collaboration Workspace supports invoking Interactive Flows and Quick Bots. Future updates will include support for Service Flows and the ability to directly @ colleagues to join the conversation for seamless human-AI co-creation.
1. Before You Start (Prerequisites)
- You have activated your GoInsight.AI account and can use Insight Chat.
- Your team has available Interactive Flows or Quick Bots, which have been created and published by a Builder in the visual orchestration backend.
- You have the necessary access and usage permissions for the relevant workflows. If a workflow needs to interact with external systems (e.g., CRM, ERP), you must also have the appropriate credentials authorized.
2. Quick Start (How-To Guide)
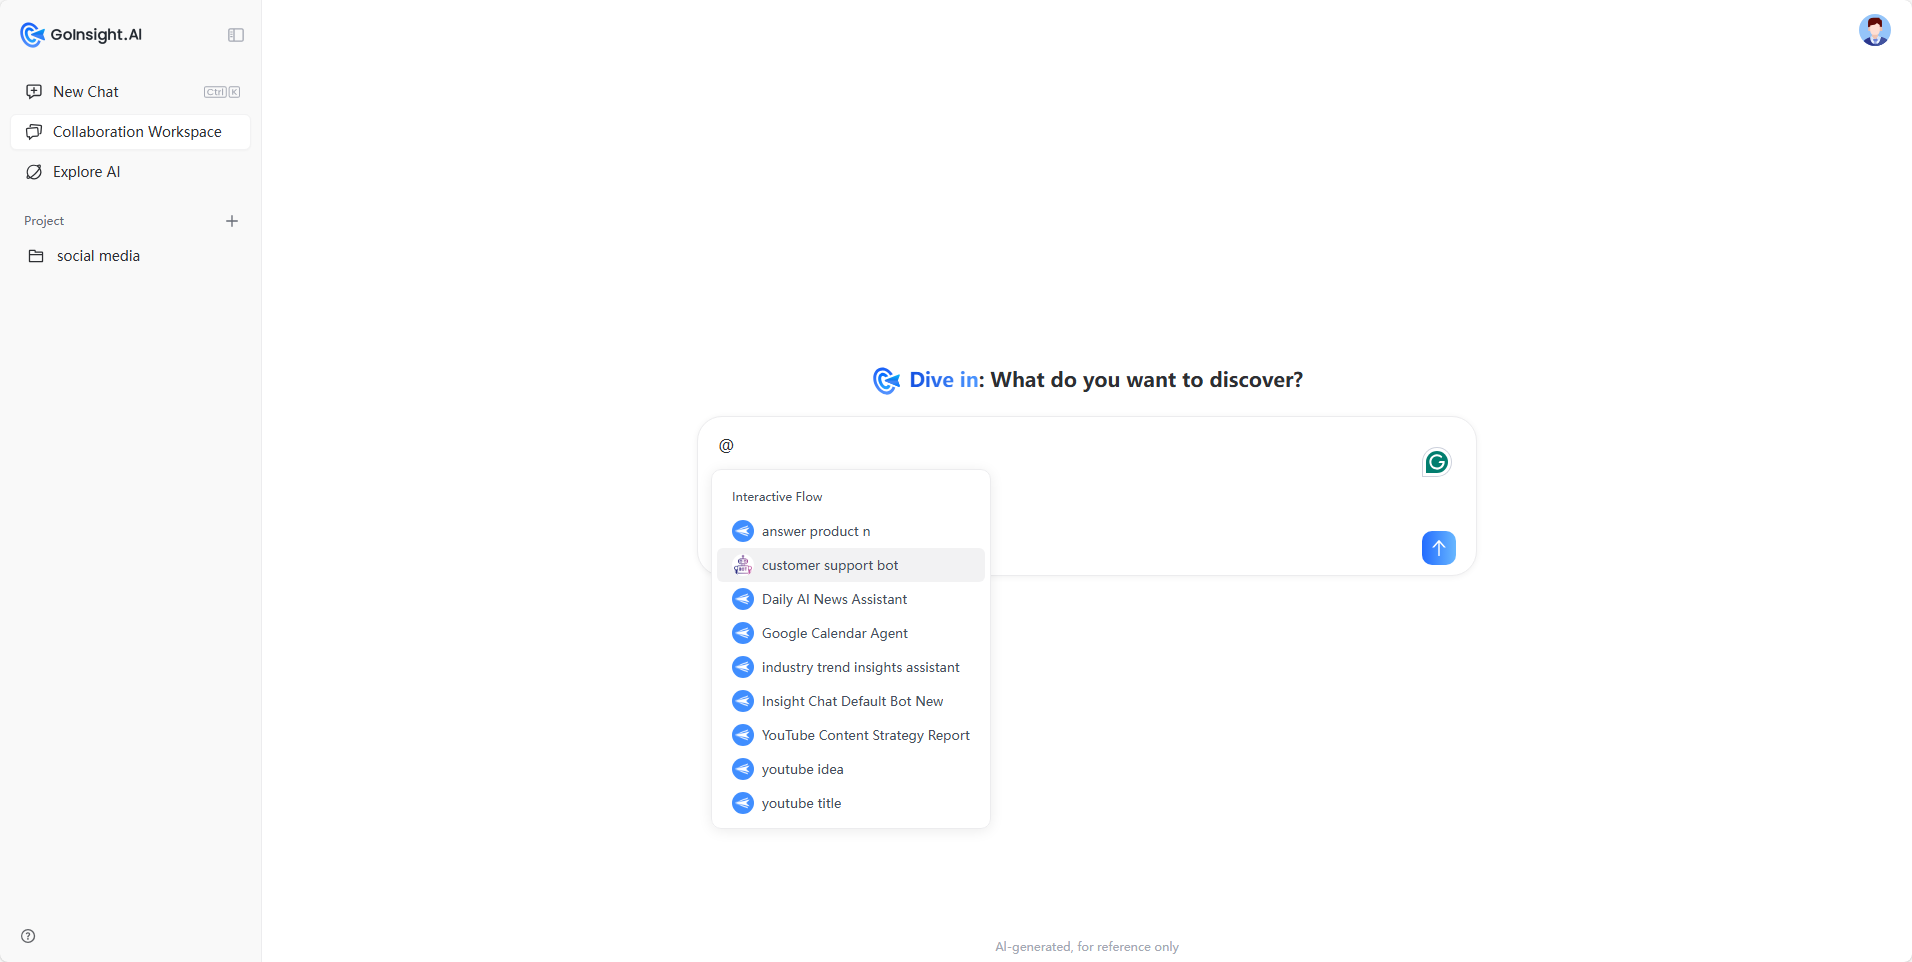
- Open the Workspace: In Insight Chat, click on Collaboration Workspace in the left-side panel.
- Type @: In the input box, type @ to bring up the "Available Objects" menu. This menu only displays the Interactive Flows and Quick Bots that you have permission to use, so each user's list may differ.
- Send Your Request: Select a workflow (or chain multiple @ invocations sequentially), type your request, and send it. The workflow will read the context from the current conversation, execute its actions, and return the results in the same chat.
Tips for the @ Menu:
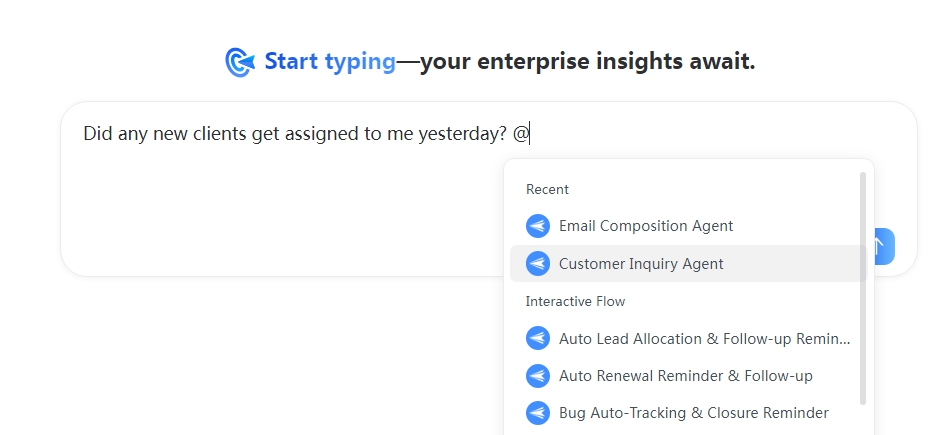
- Recent: After typing @, the top of the menu will show the workflows/bots you have recently used for quick recall.
- Real-time Filtering: Continue typing the name of an object after the @ to quickly filter the list. For example, typing "@email" will show only objects whose names start with "email".
- Permission Awareness: The list only displays objects you are currently authorized to use, so what you see may differ from other users.
- Model Selection: You do not need to manually select a large language model in the Collaboration Workspace. The model for each object is pre-configured by the Builder to ensure a stable and auditable experience.
- Keyboard Shortcuts: After typing @, use the ↑ / ↓ keys to navigate the list, press Enter to select and send, and press Esc to close the menu.
3. Core Concepts
- Shared Context: Previous messages and results in the conversation automatically become the input for subsequent steps. The next workflow can build upon the output of the previous one, enabling chained collaboration.
- Permissions & Credentials: The visibility and availability of workflows are controlled by permissions. When a workflow needs to access an external system (like a CRM, ERP, or cloud drive), it executes based on your bound credentials. If you lack permission, you will receive a failure notification.
- Inviting Colleagues & History: When a colleague is invited to the conversation, they will be able to see the entire chat history, allowing them to quickly get up to speed and contribute.
- Naming & Remarks: The title and notes set by the Builder when creating a workflow will be displayed in the @ menu and its details, helping you understand its purpose and choose the right one.
4. Common Collaboration Patterns
A. Personal Pipeline (Single-user × Multi-AI/Workflow)
Scenario: You need to complete a complex task alone, such as "Organize customer complaints → Generate improvement suggestions → Send a summary email".
Workflow:
- Define the goal and context → Use @Analysis Workflow to structure the information.
- Use @Suggestion Generator to create actionable recommendations based on the structured output.
- Use @Email Drafter to compose an external email based on the suggestions.
- Manually review the draft → Use @Send Workflow to send and archive the email.
Benefit: The entire process is completed within a single conversation, and the workflow is automatically documented and traceable.
B. Cross-departmental Co-creation (Multi-user × Multi-AI/Workflow)
Scenario: The Marketing, Sales, and Legal teams need to quickly align on and deliver a new campaign launch.
Workflow:
- Start a conversation and invite colleagues: @Marketing @Sales @Legal.
- Use @Requirements Sorter to summarize the background and goals; use @Risk Checklist to generate potential risks.
- Use @Legal QA to verify key terms; use @Budget Estimator to calculate costs and ROI.
- Humans and AI iterate based on the shared context, finally using @Plan Summary to output a one-page implementation plan.
Benefit: Reduces the back-and-forth of collecting information before meetings, taking notes during meetings, and following up after meetings. Everyone collaborates with the same context.
5. Best Practices
- Describe tasks clearly in natural language: State the purpose + key information (e.g., subject, time range, system name).
- Use @ chaining effectively: Break down large tasks into a multi-step process, like "Retrieve → Generate → Approve/Write-back".
- Reference results by name: For example, "Based on the customer list from Step A, generate three follow-up email drafts".
- Preserve and review: Keep related tasks within the same conversation for easier auditing and knowledge retention.
Friendly Suggestions for Builders:
- Keep titles concise and write clear input/output requirements and usage scenarios in the remarks.
- Clearly define the required permission scope and credential types.
- If the workflow requires form-like parameters, provide an introductory message prompting the user for the necessary information.
6. Use Case Example
This section demonstrates how to handle the scenario of "Sending a welcome email to new customers" in the Collaboration Workspace.
Prerequisites:
You need three pre-configured and authorized AI workflows available for internal use:
- "Customer Query Agent": Integrated with the company's CRM system to query customer information.
- "Email Writing Agent": Familiar with the company's business logic and email standards, capable of generating compliant email content.
- "Email Sending Agent": Equipped with the ability to execute email delivery operations.
Demonstration Flow:
Step 1: Query New Customer Information
- User input: "What new customers did I get yesterday? @Customer Query Agent"
- Simulated response: "You added three new customers yesterday. Their information is as follows: 1. [Customer 1 Name + Contact Info]; 2. [Customer 2 Name + Contact Info]; 3. [Customer 3 Name + Contact Info]".
Step 2: Automatically Write a Welcome Email
- User input: "Help me write a welcome email to Customer 1 @Email Writing Agent"
- Simulated response: "[Email Body] Dear [Customer 1 Name], We are honored that you have chosen to partner with [Company Name]... (specific business content omitted). We look forward to a successful collaboration! Best regards, [Company Name] Sales Department [Date]".
Step 3: Execute Email Sending
- User input: "Please send this email to Customer 1 @Email Sending Agent"
- Simulated response: "The email has been successfully sent to [Contact Info] for Customer 1".
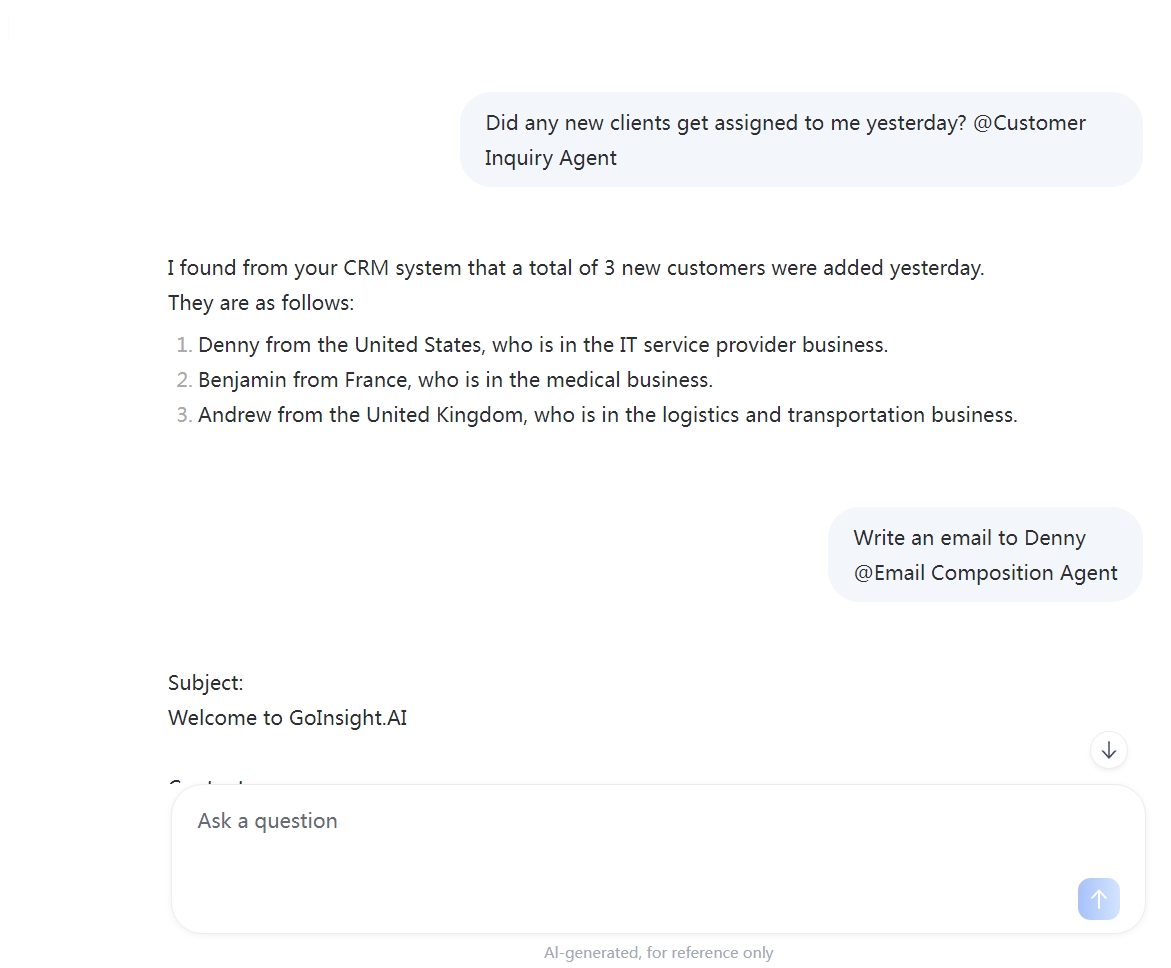
As shown in the flow above, a user can invoke multiple AI workflows as needed within the Collaboration Workspace. All chat records—including customer data and email content—are automatically synchronized as context for the corresponding workflows, eliminating the need to transfer information repeatedly. The entire operation happens in the same space, creating a seamless "Query -> Write -> Send" process that efficiently handles complex business workflows.
More Use Case Examples:
- After-Sales Support: @Search Knowledge Base to find common issues → @Generate Reply Draft → @Create Ticket to log the final reply and customer info into the system.
- Sales Outreach Prep: @Fetch Recent Leads → @Generate Call Script → @Log Call Outcome to write the result back to the CRM.
- Legal Clause Comparison: @Parse Document to extract key clauses → @Compare Differences to output a summary of changes → @Archive to store the conclusion with the document.
- Marketing Content Creation: @Research Competitors to gather key points → @Generate Article to produce a first draft → @Schedule Post to send it to a content platform or create a task.
- Expense Reporting: @Recognize Invoice from an attachment → @Check Compliance → @Submit for Approval.
- Employee Onboarding: @Create Account/Permissions → @Send Welcome Packet → @Register to HR System (form-based dialogue).
Leave a Reply.