Enterprise AI applications require integration with various internal and external systems. Managing and using these credentials safely and compliantly is a challenge for businesses. GoInsight.AI offers a "Credentials" feature, providing a centralized platform for managing and creating credentials. This allows for one-time setup and secure sharing across the entire company, effectively resolving duplicate entry issues and fundamentally eliminating the risk of credential leaks.

Credential Type
"Credential Type" is used to distinguish credentials for different products, and is also used to distinguish multiple authorization methods for the same product.
In "InsightFlow" -> "Credentials", click the "+Create" button to select the type of credential to create.
- Each credential type has a unique "Authorization Method" with the following options:
| Authorization method | Remark |
|---|---|
| API Key/Access Token | It is a string identifier generated by the platform or system and is used to verify the caller's identity and authorize access rights. |
| OAuth 2.0 Standard | It is a set of open authorization standards that uses "tokens" to achieve secure authorization without exposing third-party account passwords. |
| Account password | The most basic authentication credentials, consisting of a username + password combination |
| HTTP Basic Authentication | HTTP protocol built-in simple authentication mechanism, by appending the encoded account password (Base64 encoding) in the request header to verify the identity |
| Custom | Users can customize the variable name, number of variables and values output by this authorization method, providing the highest flexibility |
- System Credential Type:
GoInsight.AI has preset various "system credential types" for users, covering various common products on the market, such as Gmail, Google Drive, Hubspot, etc. Users can create credentials for the corresponding product under the corresponding "system credential type".
- Custom Credential Type:
If the system doesn't provide the credential type you need, you can create a "custom credential type". When creating a custom credential type, you must provide a "Name", an optional "Description", and a "credential type icon". You must also select an authorization method. Once created, you can view, edit, and delete it in "Credentials" - "Custom credential types".
- If you select "OAuth 2.0 Standard" for the authorization method, you need to fill in the following settings:
| Parameter name | Remark |
|---|---|
| Client ID | Required, unique application identifier assigned by a third-party platform |
| Client Secret | Required, application key |
| Token URL | Required, the interface address used by the third-party platform to exchange/refresh tokens |
| Authorization URL | Required, the page address that guides users to complete authorization |
| Authorization Content Type | Required, defines the content format of the authorization request. Available options include: "application/json" and "application/x-www-form-urlencoded" |
| Scope | Optional, limit the scope of authority of the credential |
| Redirect URL | After the authorization is completed, the third-party platform jumps back to the system address. Default value: https://insight-api.goinsight.ai/oauth2/workflow/callback |
Users must obtain the above parameters from third-party platforms. The specific path to obtain these parameters may vary depending on the platform's design, but generally follows the process of "Log in to the developer platform - Create an application - Consult the documentation to obtain configuration information". The following are links to some common platforms "OAuth 2.0" documentation:
- Using OAuth 2.0 to Access Google APIs
- Hubspot: OAuth Quickstart Guide
- Microsoft identity platform and OAuth 2.0 authorization code flow
- If you select "Custom" for the authorization method:
You can click the "+" on the right to add variables. Each added variable must enter the variable name.
Credentials
Credentials are the key information carrier used to establish trusted connections between the system and third-party products or different internal modules. They ensure that the system can correctly identify and obtain legitimate permissions when calling third-party functions, transmitting data, or performing specific operations, while also ensuring the security and compliance of the entire interaction process. They are the core "pass" for achieving cross-platform and cross-module collaboration.
- Create credentials:
① In "InsightFlow" -> "Credentials", click the "+ Create" button to choose to create a credential;
② In the workflow, select the specified "Tools" -> "Select a credential" option and click "+New Credential".
There are two creation options: Basic Settings and Permissions.
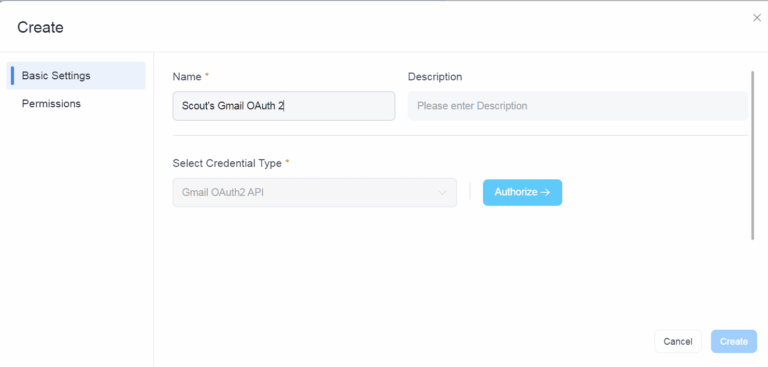
In the Basic Settings: the "Name" of the credential is required, the "Description" is optional, and the "Credential Type" is required. The optional "Credential Type" here includes "System Credential Type" and "Custom Credential Type". After selecting, you need to fill in the corresponding parameters according to the authorization method of the "Credential Type". The following is a detailed description:
| Authorization method | Fill in the parameters |
|---|---|
| API Key / Access Token | Required "API Key / Access Token" |
| OAuth 2.0 Standard | Click the "Authorize" button to automatically jump to the corresponding platform website for authorization. After successful authorization, the button will change to "Reauthorize" |
| Account password | "Account" and "Password" are required |
| HTTP Basic Authentication | "Account" and "Password" are required |
| Custom | Required "Custom Variable" value |
In the Permission settings: you can add groups/team members to help you manage your credentials. Click the "Add Group/Team Member" button to search and add specific groups and members, and set permissions for the invited members/groups. The permissions include:
① Viewer Mode; ② Editor Mode; ③ Manager Mode
"Make public within organization button": Once enabled, everyone in the company can view and use the credential, and permissions can also be set.
"Private status, personal use only button": Once turned on, the credential will only be visible to you, and the permissions of invited members will be revoked.
Instructions for Using Credentials/Credential Type
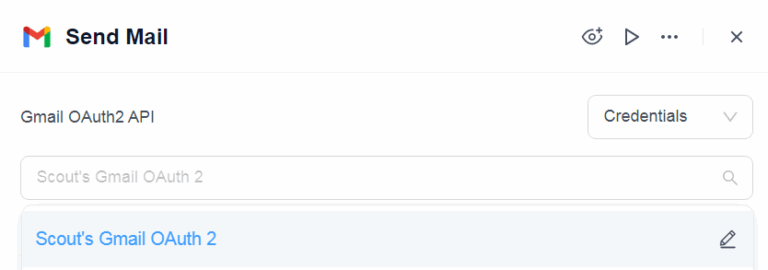
When creating a tool, such as a "Send Email via Gmail" tool, the tool requires the user’s Gmail OAuth 2.0 authorization. Therefore, when creating the tool, we need to add the "Gmail OAuth2 API" credential type as the tool's authorization method. When using the tool, the user will be asked to enter the corresponding credentials. Therefore:
- When arranging the workflow of the "Tool", you can specify which credential type the tool requires, but you cannot fill in the specific credentials.
- When using tools in a workflow, you can configure the "credentials" required by the corresponding tool.
Configuration of Credential Type in Tool Orchestration:
When creating/editing a tool, select "Authorization Method" in the "Start Node". You can choose to require authorization or not. If you select "Require Authorization", the "Select Credential Type" option will appear below. Click the "+" on the right to select:
- Add a credential type
- Add a credential type group
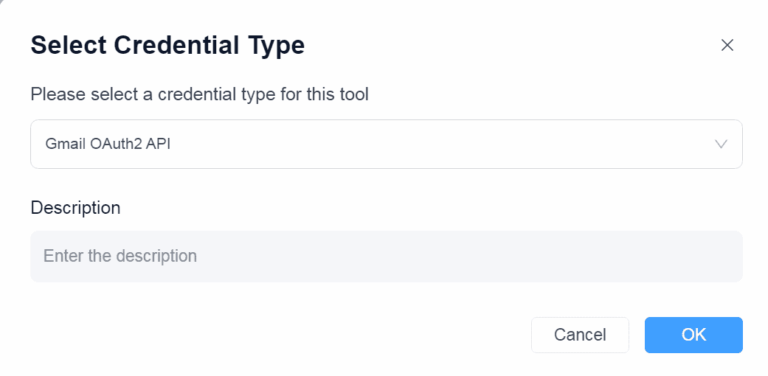
When connecting internal and external systems, only one authentication method will be used. Furthermore, our tool orchestration only considers one authentication method. In this case, we can select "Add a credential type" as shown below:
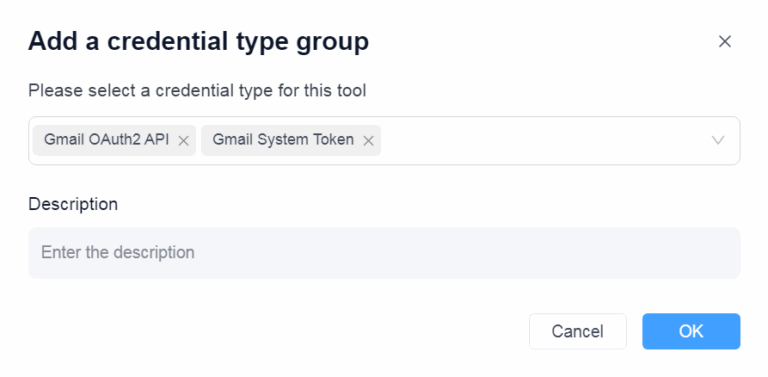
In some complex tool orchestrations, if users need to consider multiple authentication methods, they can choose to "Add a credential type group", as shown below:
After adding, the start node will generate corresponding credential-related variables, such as CredentialId and AccessToken, for use in subsequent tool workflow orchestration.
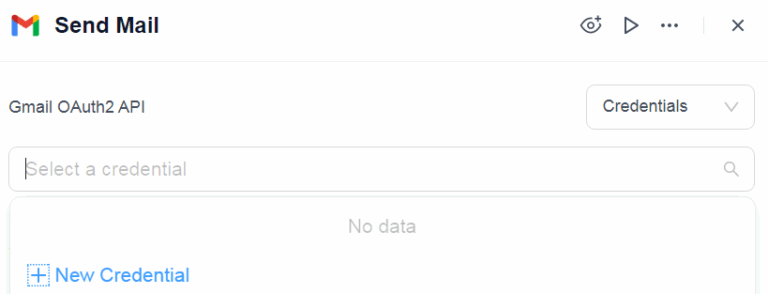
Call tools in workflows using Credentials:
When using a tool in a workflow, if the tool requires credentials, you need to fill them in before you can use the tool. If "No data" is displayed when using it for the first time, you can click "+ New Credential" to create a credential:
Follow the instructions to create the credential:
The Tool Credentials column will show available credentials for use:
Leave a Reply.