1. What Is Knowledge Base
Knowledge Base serves as a data source where you can upload and structure various types of information, such as internal documents, FAQs, and guidelines. It can be used by a node while creating workflows, and then available for retrieval by Large Language Models (LLMs) when processing queries.
For instance, customer support teams can use workflow to provide accurate and consistent answers to customer queries by uploading the knowledge base of product information and tutorials.
The benefits of using knowledge base for AI workflows:
- Enhanced Accuracy:When an LLM receives a user's question, it first searches the knowledge base for relevant content, supplying the LLM with crucial context to generate precise and accurate responses.
- Real-time Updates:Unlike the static pre-training data of AI models, a knowledge base can be updated instantly. This ensures that the LLM always has access to the most current information.
- Customization and Flexibility:Developers can tailor the content of the knowledge base to meet specific needs, adjusting the scope of knowledge as required.
- Reduced Hallucinations:By grounding responses in actual documents retrieved from the knowledge base, the LLM is less likely to produce hallucinations.
2. Tips to Create Knowledge Base
The quality of knowledge base directly decides the effectiveness of AI's responses, so it's crucial to carefully craft your knowledge base.
Here are some tips for creating your knowledge base:
- Use Formatted Text:Rather than plain text, use formatted text to emphasize sections, paragraphs, lists, etc., to help AI comprehend their relationships.
- Correctly Mark Titles:Use a heading style instead of bold font to distinguish the titles of each section.
- Use Lists:Use unordered or ordered lists for paragraphs of the same type, such as steps, processes, and feature sets.
- Ensure Clear and Explicit Content:Maintain clarity and precision in the article's content. Avoid complex logic and ambiguous terms.
3. How to Create Knowledge Base
We will show you how to create knowledge base and train the data in this part.
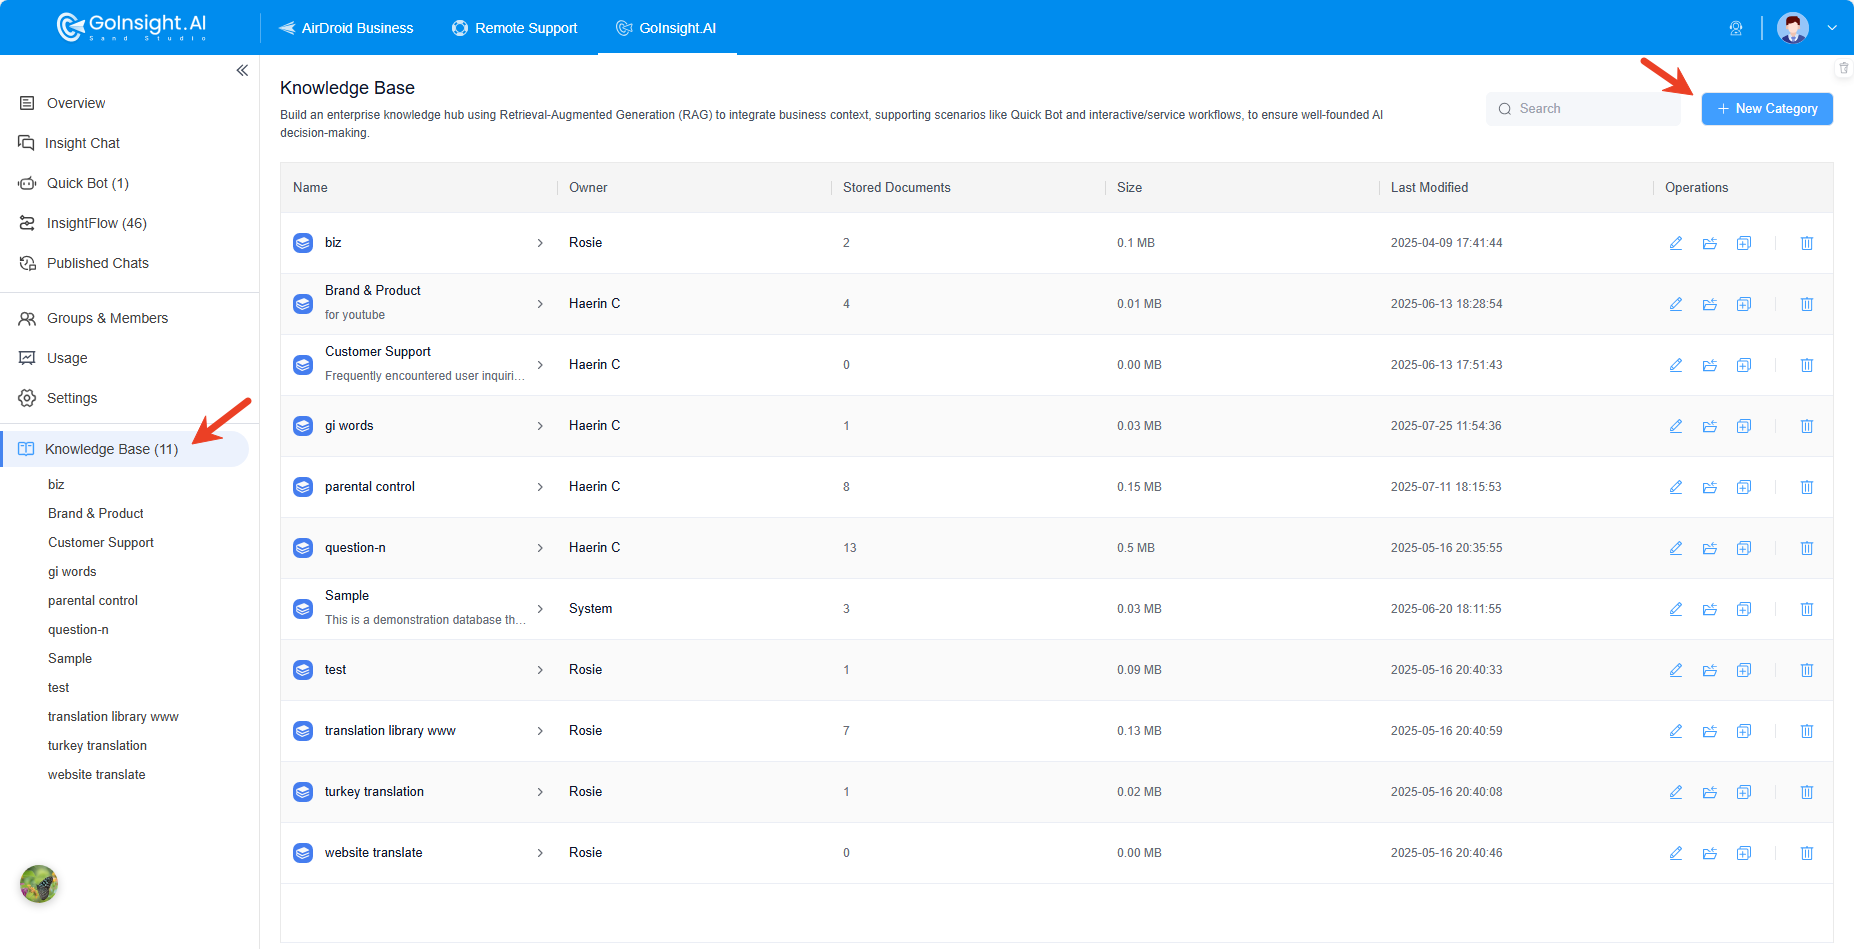
3.1 Create a Category
- Step 1.Log into the GoInsight.AI platform.
- Step 2.Click "Knowledge Base" on the left menu.
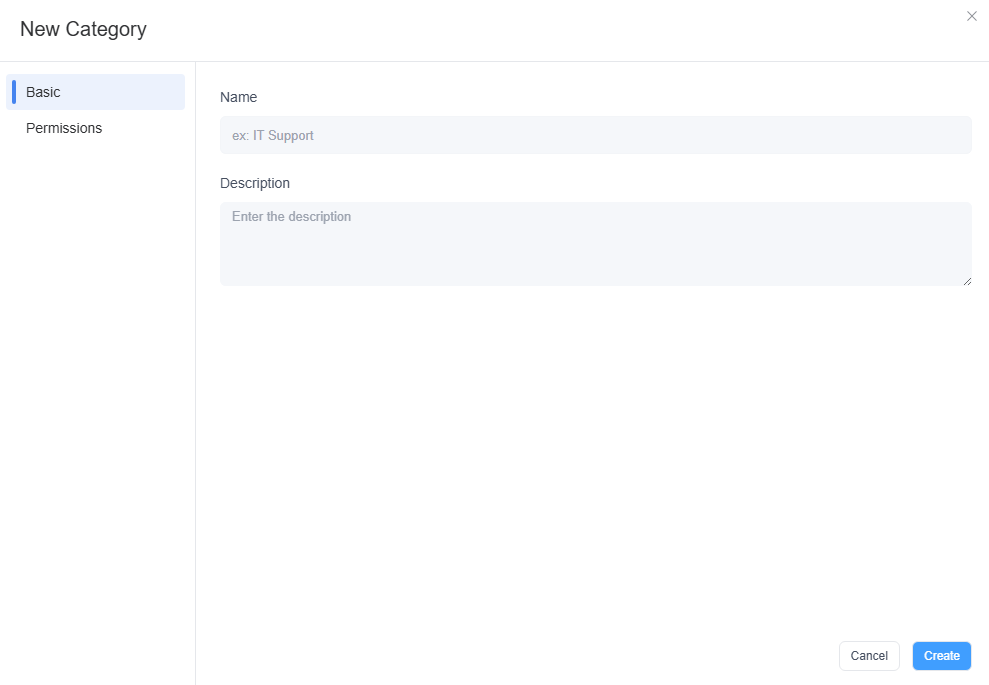
- Step 3.Click "New Category" on the upper right.
- Step 4.Enter a name for your knowledge base. You can write a description to to tell what it's about (optional). Then click the "Create" button.
3.2 Add Content
You can now add information to the knowledge base using four methods: creating a rich text document, creating a code/plain text document, uploading files, or importing from websites.
Create Rich Text Doc
Click on the "Create Rich Text Doc" card to start editing content on the editor. You can either write it manually or paste content to the editor. You can also save a blank document if you prefer to keep it empty for later editing.

There are two types of editors: Markdown and WYSIWYG.
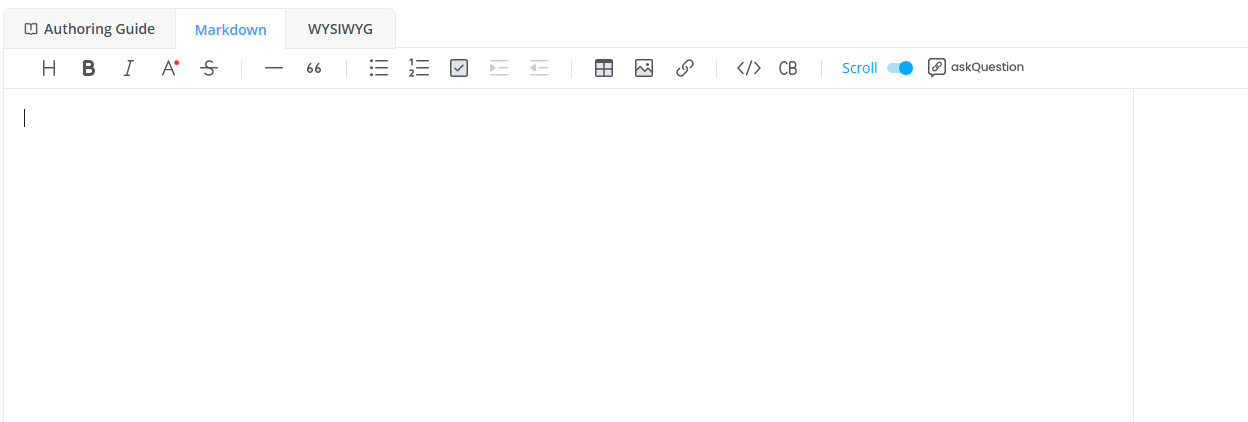
Markdown is a lightweight markup language that uses plain text formatting syntax to create structured documents, enabling you to modify content in the Markdown format and preview the content.
Basic syntax example:
- Headings: # Heading 1, ## Heading 2, ### Heading 3
- Bold: **bold text**
- Italic: *italic text*
WYSIWYG - What You See Is What You Get, on the other hand, is a visual editor where you can see how the content will look when it's displayed on a webpage or document when editing.
Create Code/Plain Text Doc
You can also create code or plain text documents in your Knowledge Base. This option is designed for storing pure text or code files, which can be used as configuration files or reference materials in workflows.
To get started, click “Create Code/Plain Text Doc”, choose the language you’d like to use, and either type directly into the editor or paste your existing content.

Supported formats include:
- Plain Text
- JSON
- Python
- Jinja
- XML
- YAML
Uploading Documents
The third method to add source data to the knowledge base, is to upload documents.
Click the "Upload" card, and drag and drop the documents to the pane, or click to upload as many documents as needed. You can upload markdown, text or docx documents.
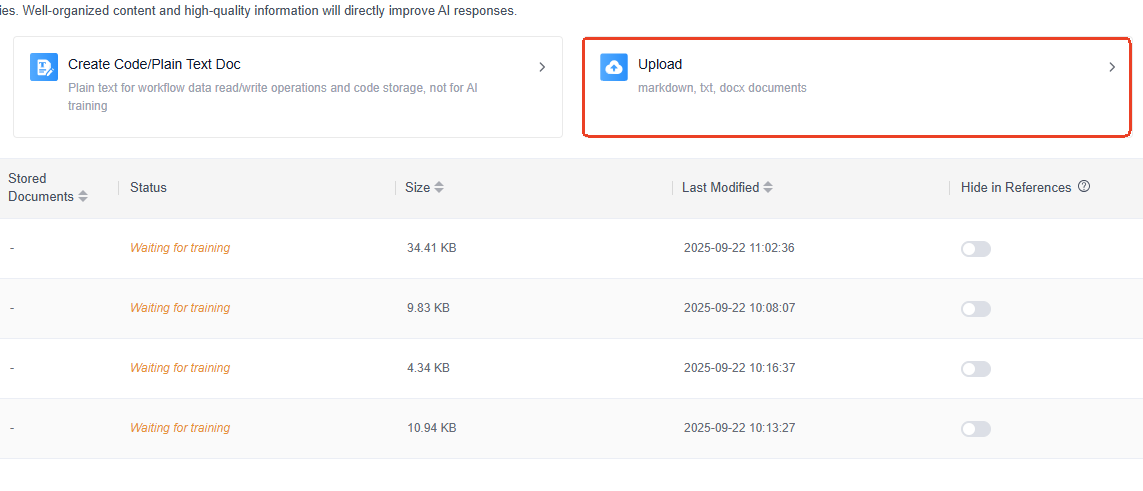
Another faster way to upload documents is using the entire list module of the page, which is an uploading area, allowing users to directly drag files to the list location to upload documents directly.
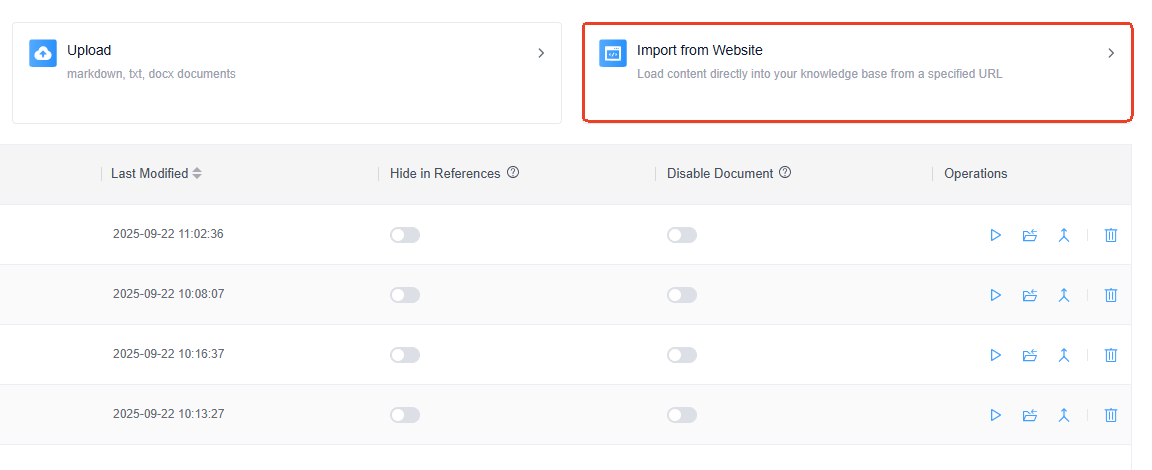
Importing from Website
Import from website is approachable to add webpage data to the knowledge base.
Simply click the "Import from Website" card, enter the URL, and click the "Import" button. Ensure to include "http://" or "https://".
3.3 Train Data
After adding necessary content to the knowledge base, you will see the document status becomes "Waiting for training", then it's time to train the data.
- Step 1.Click the file name.
- Step 2.Click on the "Save and train" button.
- Step 3.Wait for the training process to complete.
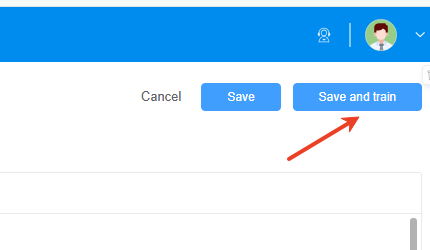
Once done, the Status will be marked as "Trained".
4. How to Manage Knowledge Base and Its Documents
The Knowledge Base in GoInsight.AI is structured into categories for better management. Each category acts as a repository for related content, simplifying navigation and helping users quickly find the information they need.
This part introduces how to manage your knowledge base and its documents.
4.1 How to Manage Knowledge Base
- Step 1.Click "Knowledge Base" from the menu on the left.
- Step 2.Scroll up and down to locate the category you want to manage.
- Step 3.You will see some buttons under "Operations".
- Step 4.Click the "Edit" button, and you can edit the category, such as rename, or modify the description.
- Step 5.Click the "Duplicate Knowledge Base" button, and it will be duplicated.
- Step 6.Click the "Delete" button and you can delete it.

4.2 How to Manage Documents
If you want to manage the documents in the knowledge base, follow these steps:
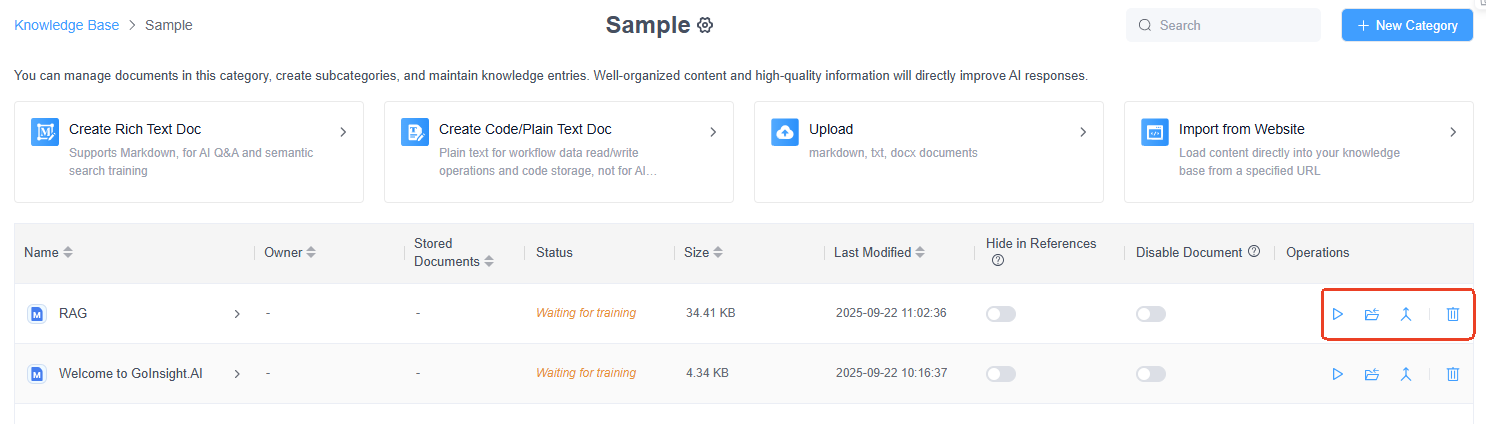
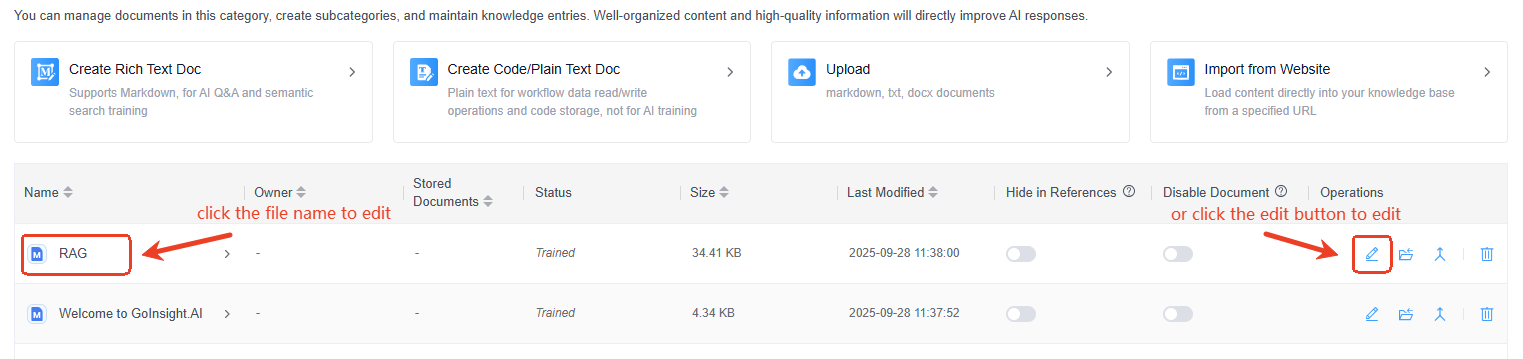
- Step 1.Click the name of the knowledge base.
- Step 2.You will see each document from the list. You can then:
- Edit: click the "Edit" button to edit the document, save and train again (if any changes are made).
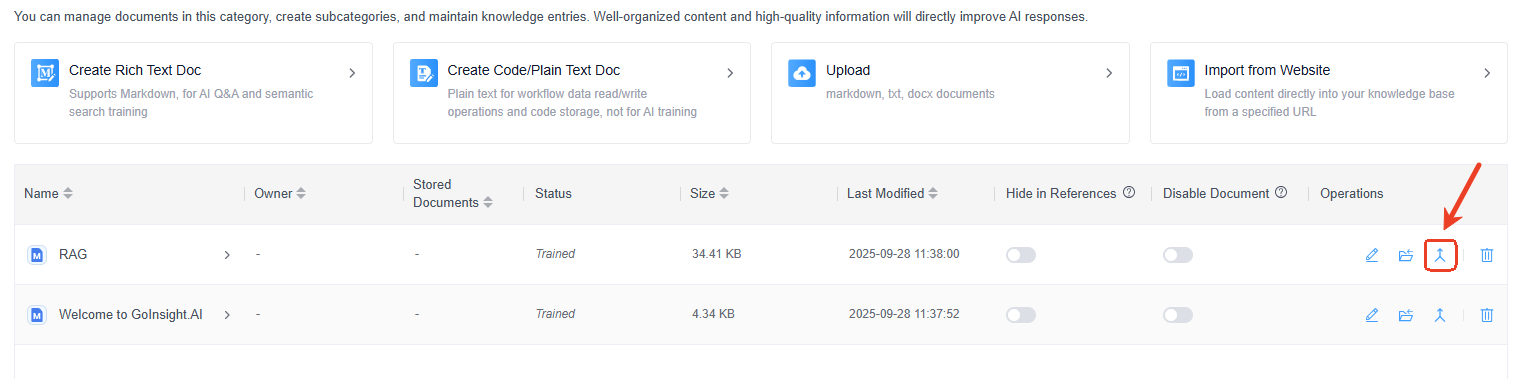
- Move Document: click the "Move Document" button to move it to another category.
- Compare Documents: click the "Compare Documents" to compare and edit the original document.
- Delete: click the "Delete" button to delete the document.
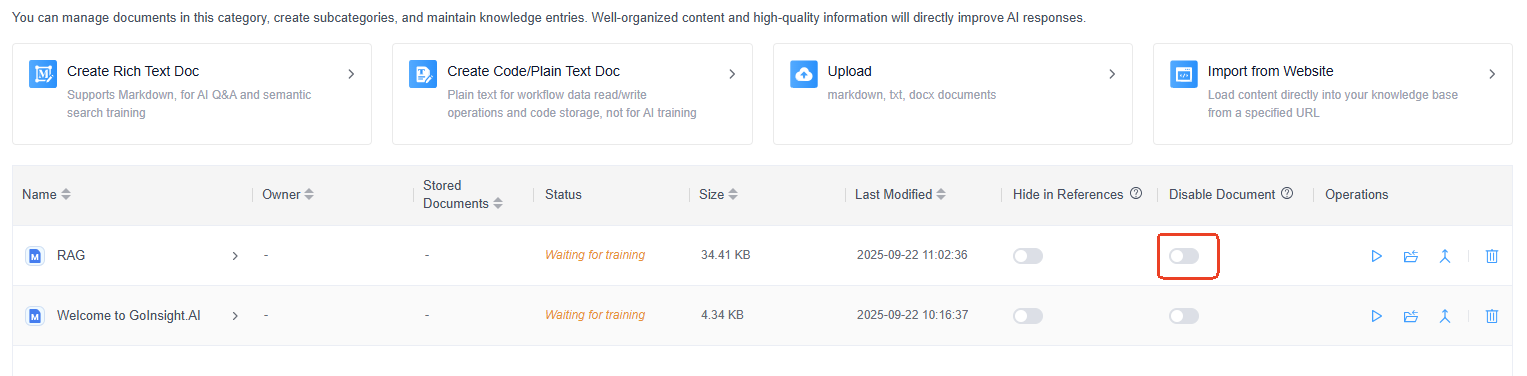
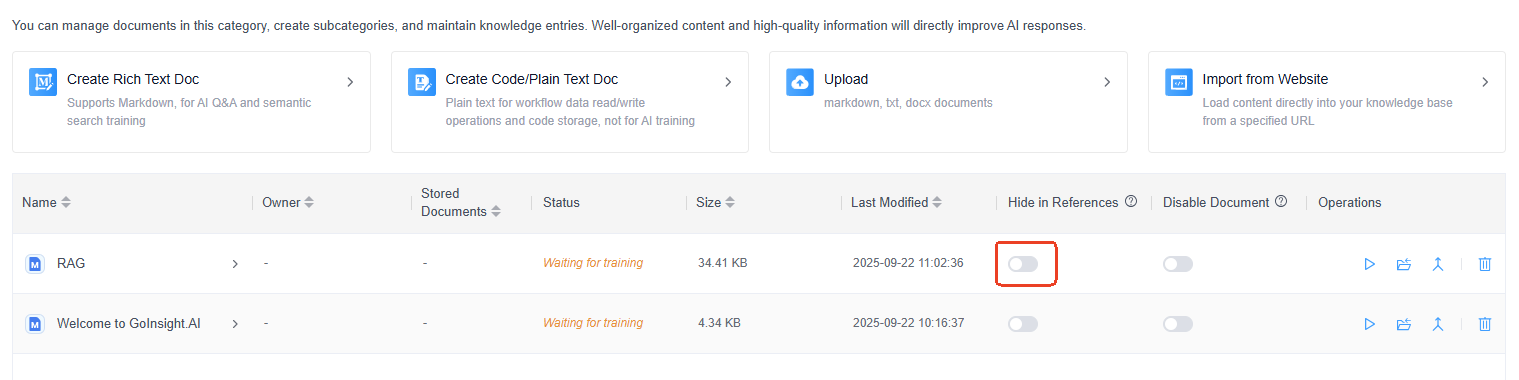
- Step 3.If you want to disable the document, simply turn on the toggle under "Disable Document". Once disabled, the AI workflow will not provide relevant information.
- Step 4.You can also hide the document by toggling on under "Hide in References". Once hidden, it will stop the AI bot from referencing the document in the answers.
5. How to Optimize Knowledge Base
One of the biggest benefits of using the knowledge base is that the source data can be optimized or updated whenever necessary. So if you find mistaken or outdated information in the document, you can easily optimize or update it.
There are two ways to optimize/update the knowledge base:
Method 1: By Editing the Original Document
- Step 1.Click the knowledge base you want to update and locate the document.
- Step 2.Click the document name or the Edit button to enter the editor.

- Step 3.Simply make changes to the document.
- Step 4.Once updated, click the "Save and train" button to apply.
This method is recommended when you want to make tiny changes.
Method 2: By Comparing the Documents
- Step 1.Click the knowledge base you want to update and locate the document.
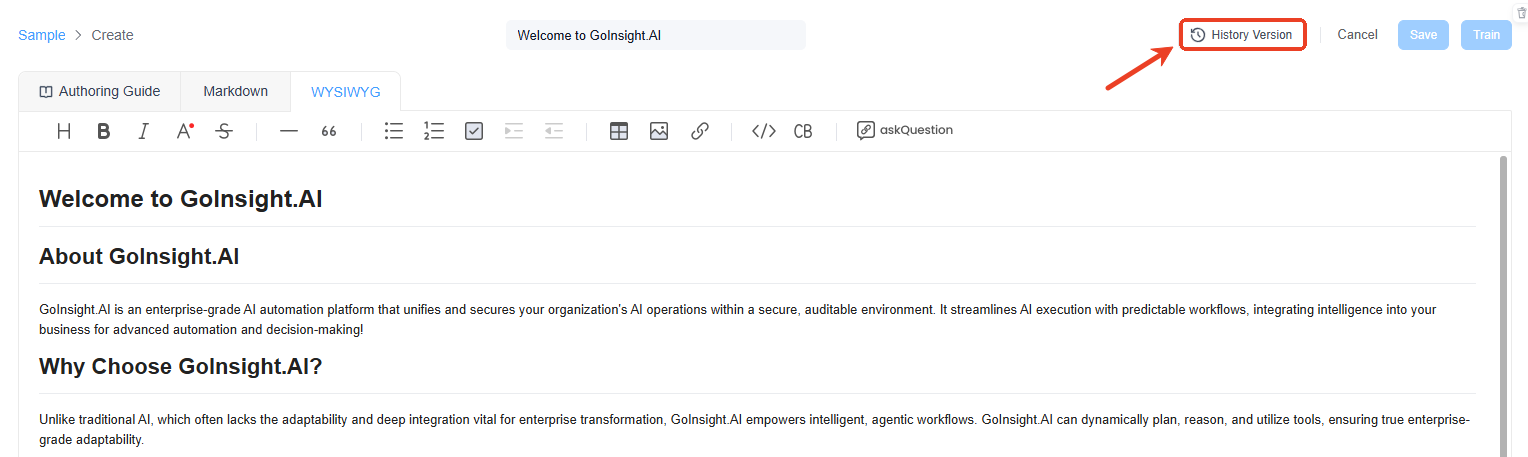
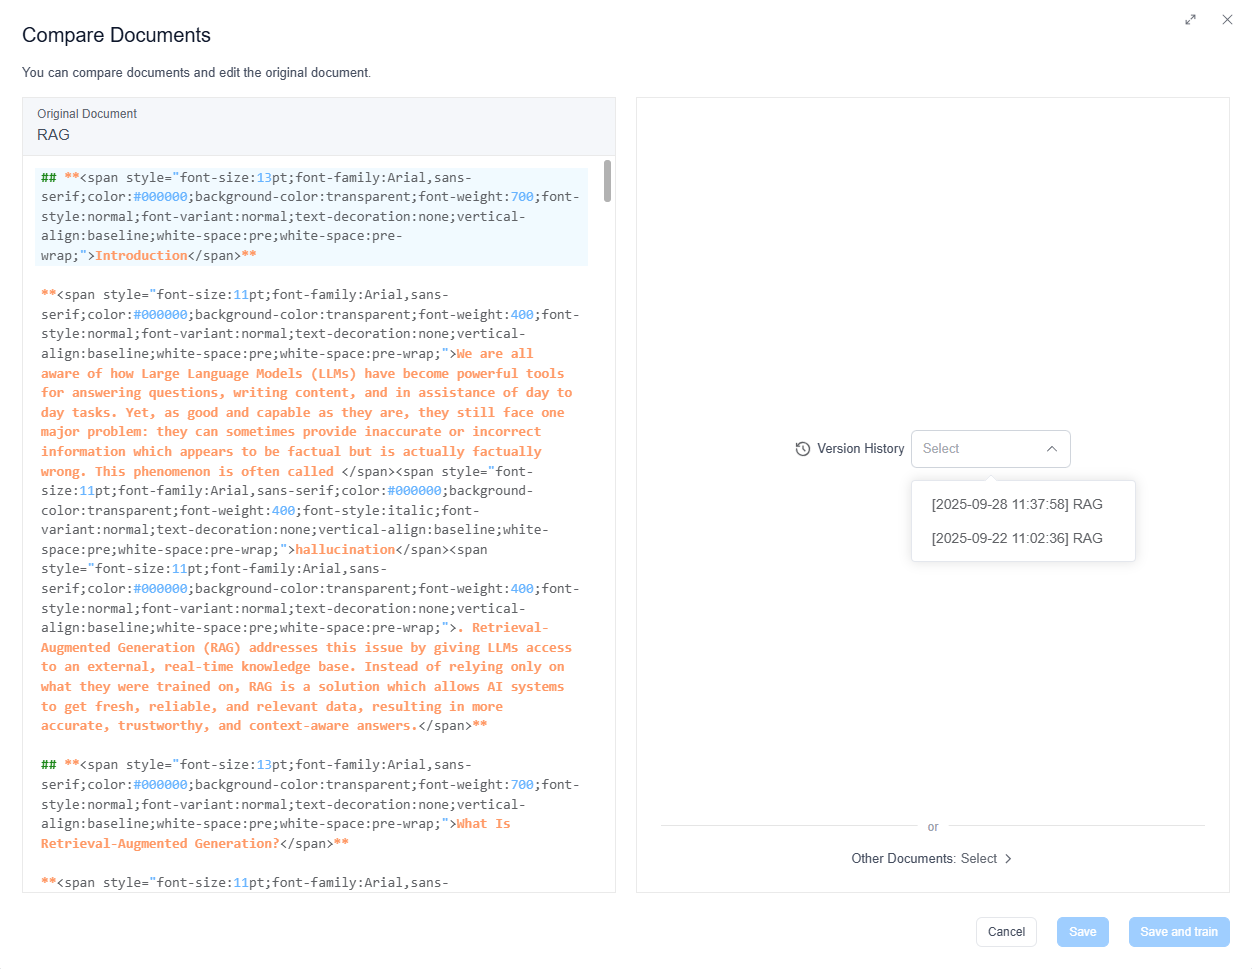
- Step 2.You can launch the comparison interface by clicking the "Compare Documents" button or the “History Version” button inside the editor.
- Step 3.On the left, you will see the existing version of the original document. On the right, you will see two options to compare:
- Option 1: Version History: You can select one of the historical versions of the current document.
- Option 2: Other Documents: You can select other documents under all the knowledge base.
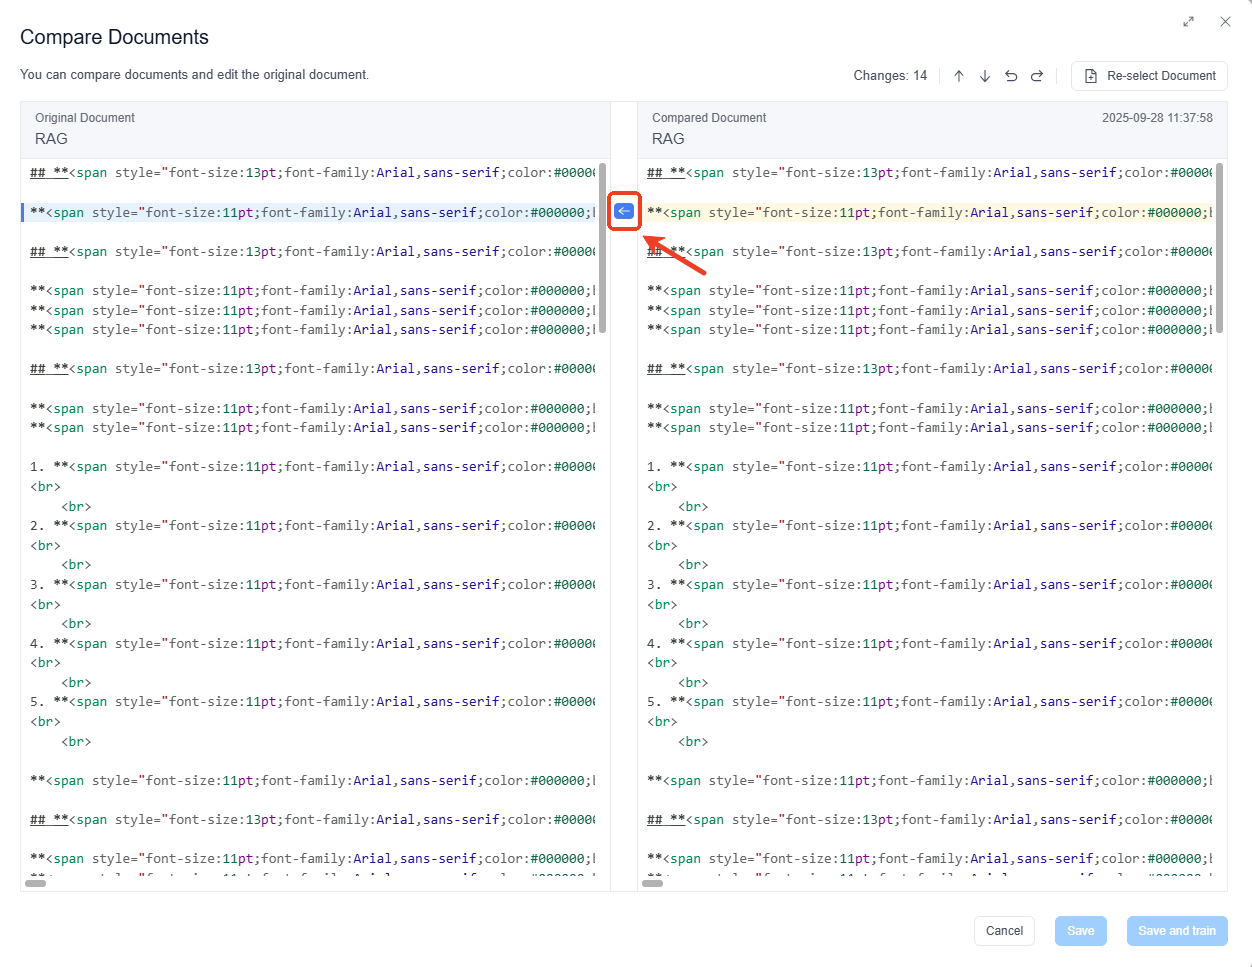
- Step 4.Select either option, then the Original Document and the Compared Document are displayed side-by-side.
- Step 5.You can manually edit the original document on the left side while referencing the compared document on the right.
Alternatively, you can sync the content of the Compared Document with the Original Document by clicking the blue arrow between the two text display areas.
Once done, click the "Save" button or "Save and train" button to complete.
Note:
- Members with view-only permissions can view but not edit the compared documents.
- Any document with viewing permissions can be selected as the Compared Document.
- Only one team member can edit the Original Document at a time. Others will be notified that the document is being edited.
This method significantly aids administrators in comparing multiple document modifications. This feature streamlines the process of tracking changes, thereby enhancing the optimization of the knowledge base and boosting the chatbot's performance.
6. How to Manage Permissions for Knowledge Base
You can decide who can view, edit, and manage the knowledge base by modifying the permissions.
- Step 1.Click "Knowledge Base" from the menu on the left.
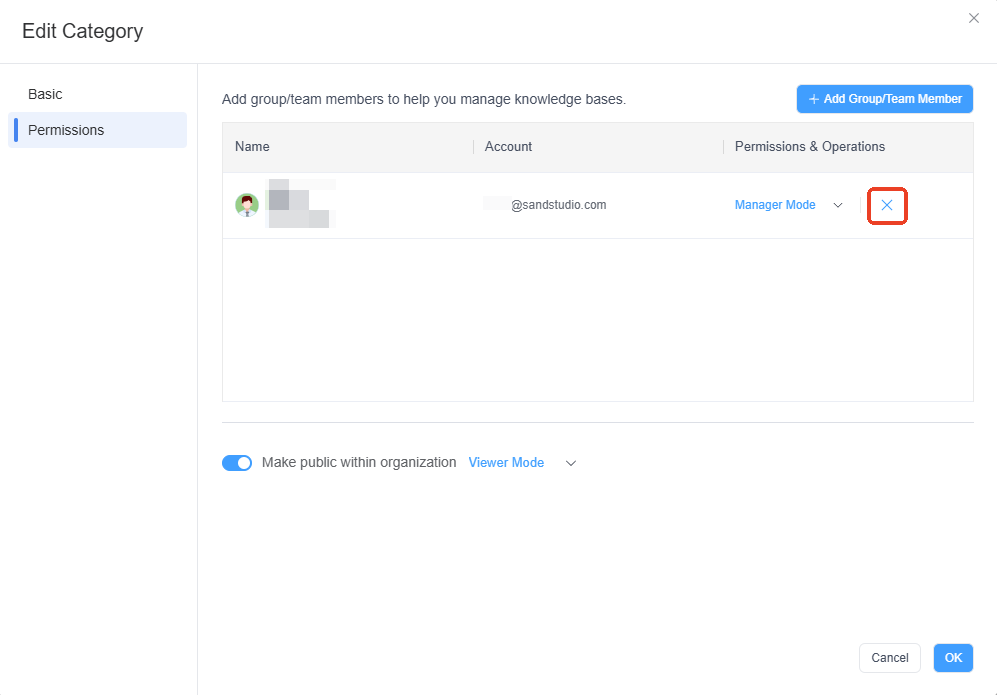
- Step 2.Locate the category you want to modify the permission, and click the "Edit" button under "Operations".
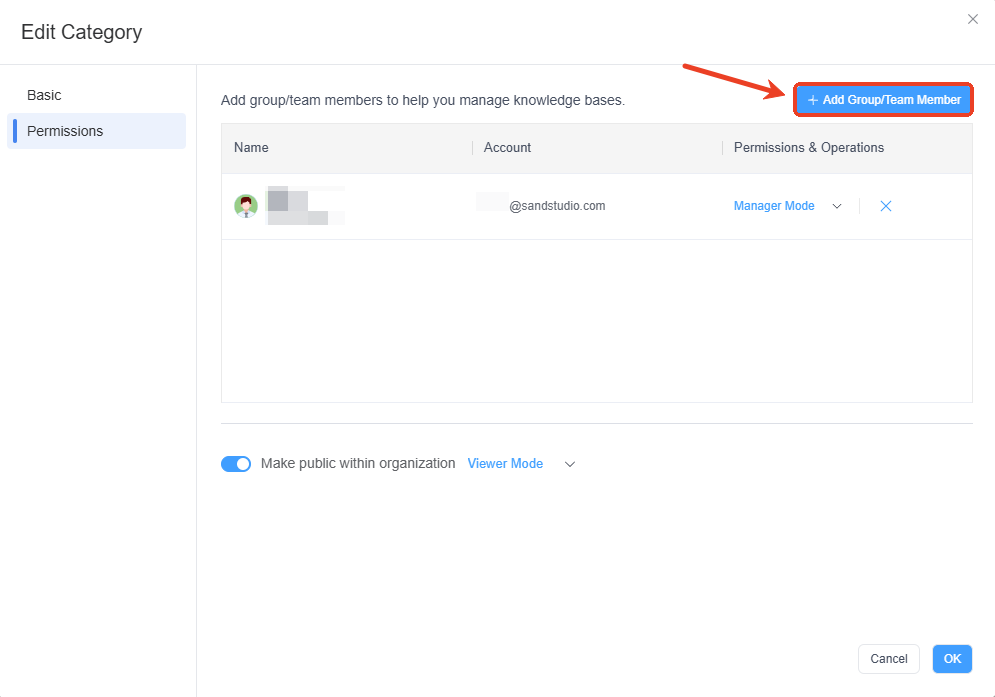
- Step 3.Click "Team Members & Permissions". Then you can:
- Add members: If you want to add members, click the "Add Group/Team Member", select the one(s) from the list, and click "OK".
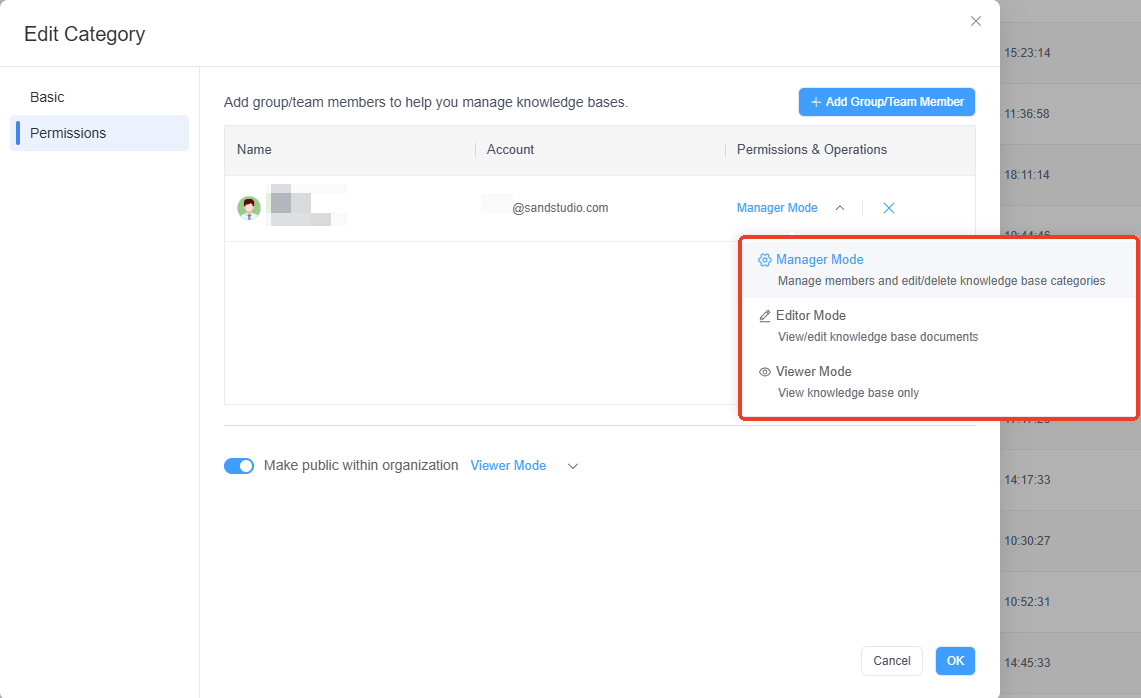
- Change the permission: If you want to change the permission mode, click the down-arrow next to the member/group, and select "Manager Mode", "Editor Mode", or "Viewer Mode".
- Remove members: If you want to remove someone from accessing the knowledge base category, click the "Remove" button next to the member/group, and confirm the change.
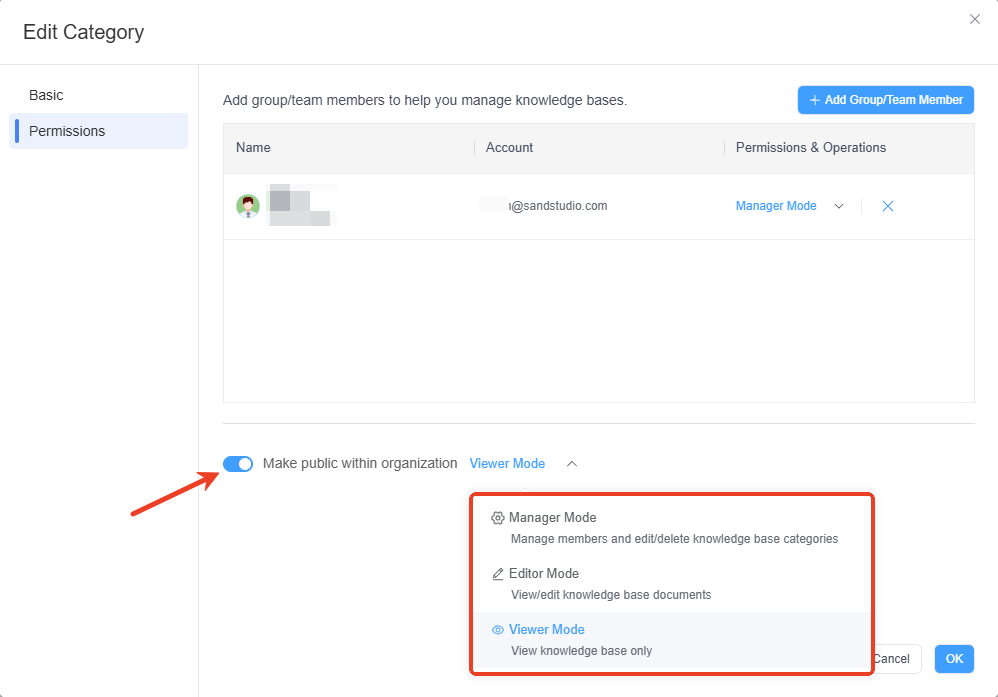
- Decide to make it public within organization: Toggle the button for "Make public within organization". It's on by default. Moreover, you can also make it "Viewer Mode", "Editor Mode", or "Manager Mode" within the organization.
- Step 4.Once done, click the "OK" button to save the change(s).
Leave a Reply.