How to Create a REST API in Python – A Beginner’s Guide
Before we begin
Try GoInsight.ai to integrate an external API, you get a low-code, visually orchestrated workflow complete with built-in AI, security, error handling, and auditing features right away.
Creating an API is a fundamental skill for modern web development. Today, REST API's are arguably the most common type of APIs to build because of their seamless communication between systems.
So, if you're also wondering how to build a REST API in Python, this guide got you covered. It outlines a detailed, step-by-step procedure to create a RESTful API that can be expanded and customized to fit your website. Let's get to the business!
Creating a REST API
Here's a quick summary of the steps to create a REST API for your website using Python:
Task | Steps |
RESTful API Creation | 1. Understand REST API structure |
Part 1: What is a REST API?
API stands for Application Programming Interface. It is a set of defined rules that allows different software entities to communicate with one another. In simpler terms, it is a contract between a server and client that defines how data should be requested and delivered.
As such, a REST API is a software architectural style for designing networked applications, especially web services. It uses HTTP requests to enable clients to perform CRUD (Create, Read, Update, Delete) operations on data.
Core Elements of a REST API
The core elements that define a REST API include five mandatory and one optional principles. These are:
-
Statelessness: Each API request must contain all necessary information the server needs to process it. No client context or session is stored on the server between requests.
- Client-Server Architecture: The system is divided into two separate entities:
This separation of concerns between frontend and backend improves flexibility➢ The client, like the web app or mobile app, which requests resources or services.
➢ The server which provides those resources or services.
Uniform Interface: A RESTful API must have a Consistent structure, for example, /users, /posts. It is usually accessible at a single URL, making the API predictable and easy to learn and use.
Cacheability: Responses from the server should be explicitly labeled as cacheable or non-cacheable to improve client performance. The cached responses are ready to use whenever there's a similar request in future.
- Layered system: A REST API architecture can have multiple layers between client and server, such as:
➢Load balancers
➢Authentication layers
➢Caching servers
➢Proxies - Code on demand (optional): The server can send executable code (like JavaScript) to the client, extending its functionality temporarily.
The client cannot tell whether it is connected directly to the server or through intermediaries.
Part 2: How to Make a REST API
Building a RESTful API may sound too tech-savvy, but it's not as long as you possess the basic coding skills. Let us walk you through a step-by-step procedure to design a REST API that's efficient and scalable:
Step 1: Understand What You're Building
The first step is to highlighting the resources and entities for your API. For example, if you want to create an API for a blog, the resources could be:
/posts – list of blog posts
/posts/1 – details of one blog post
/posts/1/comments – comments on a specific post
Step 2: Set Up the Development Environment
Now, you need to choose the desired tools to develop the work environment for the REST API. For this:
Programming language: Python, as it is great for beginners.
A framework: Flask, which is a lightweight web framework for Python that lets you quickly build web applications, including APIs.
A tool to test the API: like Postman or a browser.
1. Now, install Python 3 on your desktop. Once done, run the below command to check it's running properly:
python --version
# Python 3.8.9
After that, use Pip to install Flask.
pip install flask
Step 3: Build a Basic REST API
After installing Python and Flask, create a new project folder:
mkdir my-rest-api
cd my-rest-api
Inside the folder, make a new Python file called app.py.
touch app.py
Step 4: Write a Simple Flask App
This step helps you create a working Flask API. For that, write the first route inside the app.py file:
from flask import Flask
app = Flask(__name__)
@app.route("/")
def home():
return "Hello, this is my REST API!"
if __name__ == "__main__":
app.run(debug=True)
To run it, enter the command:
python app.py
Now, head to http://localhost:5000/ in your browser. You'll see the API response.
Note: @app.route("/") defines a URL endpoint. The function defines what response to send when that route is hit.
Step 5: Add A Datastore
We can use an in-memory list to store users. The example command is:
users = [
{"id": 1, "name": "Alice"},
{"id": 2, "name": "Bob"}
]
This simulates a database. Later, you can connect it to a real database like SQLite, PostgreSQL, or MongoDB.
Step 6: Add CRUD Endpoints
An endpoint in a REST API is a specific URL path that maps to a resource or action. RESTful endpoints follow consistent, predictable patterns.
1. Get All Users (GET /users)
Run the command:
from flask import jsonify
@app.route("/users", methods=["GET"])
def get_users():
return jsonify(users)
2. Get a Specific User (GET /users/<id>)
Run the command:
@app.route("/users/", methods=["GET"])
def get_user(user_id):
user = next((u for u in users if u["id"] == user_id), None)
if user:
return jsonify(user)
return jsonify({"error": "User not found"}), 404
3. Create a New User (POST /users)
The command is:
from flask import request
@app.route("/users", methods=["POST"])
def create_user():
data = request.get_json()
new_user = {
"id": len(users) + 1,
"name": data["name"]
}
users.append(new_user)
return jsonify(new_user), 201
4. Update an Existing User (PUT /users/<id>)
The command is:
@app.route("/users/", methods=["PUT"])
def update_user(user_id):
data = request.get_json()
user = next((u for u in users if u["id"] == user_id), None)
if user:
user["name"] = data["name"]
return jsonify(user)
return jsonify({"error": "User not found"}), 404
Step 7: Add Basic Input Validation
It's always recommended to validate input to ensure the requests are valid. For that, run the command:
@app.route("/users", methods=["POST"])
def create_user():
data = request.get_json()
if not data or "name" not in data:
return jsonify({"error": "Name is required"}), 400
new_user = {
"id": len(users) + 1,
"name": data["name"]
}
users.append(new_user)
return jsonify(new_user), 201
Step 8: Test the API
After building the RESTful API, you must test it thoroughly. The tools the Postman can test all routes to check for any errors. It's best to test all scenarios, including Valid requests, Invalid data, Resource not found, and Duplicate entries.
Step 9: Document and Share REST API
Finally, you should document the API using the OpenAPI specification. Be sure to include all the relevant information, like Endpoints, Methods, Request format, Response format, and Status codes. Once ready, you can share your API with the world.
And that's how you create a robust REST API that can be deployed to a website. Be sure to regularly assess and maintain the API for maximum efficiency.
Part 3: Why Use REST API in ETL and Data Integration
RESTful APIs are highly popular for making the ERL processes more secure and efficient. Features like layered systems and cacheability make them an excellent choice for data-driven processes.
Here are the common benefits of REST APIs:
- Simplicity: These APIs use standard HTTP verbs like GET, POST, PUT, and DELETE. So, developers don't have to learn a new protocol to perform the tasks.
- Scalability: In REST APIs, each request is independent and contains all the necessary information. This stateless nature makes scaling the applications very easy.
- Platform independence: They work with any programming language and platform, including mobile, web, and desktop apps.
- Readability and maintenance: REST APIs use structured URLs to represent resources. It makes endpoints intuitive and easy to read, even for non-developers. Additionally, clients can make changes to the new versions without affecting the existing apps.
Building AI-driven, Enterprise-grade APIs and Workflows with GoInsight.ai
GoInsight.ai is a low-code platform designed to help you rapidly build, automate, and deploy enterprise-level AI workflows. By connecting large language models (LLMs), custom logic nodes, and external APIs in a visual editor, GoInsight.ai reducing development time and effort.
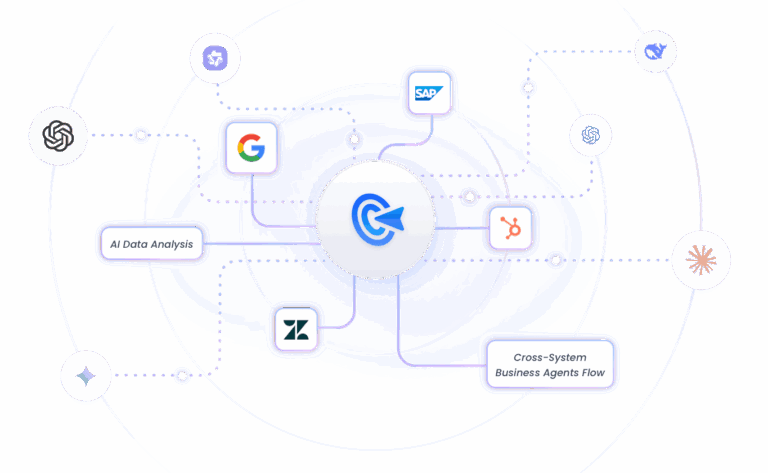
Here are some key benefits:
- Visual Workflow Design: Offers a visual flow editor where you drag and drop nodes (e.g., HTTP Request, LLM, Condition, JSON parsing), reducing the time to build, test, and publish.
- Seamless AI Capabilities: Easily embed large-language-model (LLM) nodes (or multi-agent nodes) inside a flow that interfaces with external APIs, bringing text analysis, content generation, or advanced logic directly into your automation.
- Built-In Error Handling and Conditional Logic: Easily define conditional flows (IF/Switch nodes) to handle various status codes.
- Enterprise-grade security: When you publish a flow as an API endpoint, GoInsight.ai manages security, throttling, and logging—simplifying compliance.
Other features include:
- Private knowledge integration to keep sensitive data in-house.
- Auotmates your business tasks, like IT & DevOp, Marketing, Sales, and Customer Service for unmatched efficiency.
- Integrates specialized AI agents with human oversight to assist in critical decisions.
- It seamlessly embeds into yoru enterprise's tech infrastructure, including Legacy systems, Database monitoring tools, and Cloud and on-premise environments.
Conclusion
This guide covers everything you need to know about how to build REST API for a website in Python. The best part, Python and Flask make it incredibly easy to create a production-ready API. Now, it's up to you to tweak the code to match your specific needs. Also, By using GoInsight.ai to create APIs, you get a system that's easy to set up with minimal coding. Instead of spending time on coding and fixing a custom solution, you can focus on business logic and innovative AI-driven automations.
Feel free to ask any questions.
FAQs
Q1: What is the difference between REST API and Web API?
A Web API is a general term for APIs, while REST API is a type of Web API that follows REST principles.
Q2: Can I use Django instead of Flask?
Yes, Django Rest Framework is great for larger applications with ORM and admin panels.
Q3: How do I protect my API from unauthorized users?
Use authentication methods like JWT or OAuth2 to secure your REST API. In addition, be sure always to validate input nefore deploying it.
Q4: Should I use FastAPI or Flask?
Flask is known for its flexible routing and strong ecosystem support, making it easy to build REST API. FastAPI, on the other hand, is excellent for enhanced performance and async support.
Q5: Is JSON the only format used in REST APIs?
No. XML is also used, but JSON is more common and lightweight.


Leave a Reply.