How to Build a Slack Bot: A Step-by-Step Guide
Building a Slack bot? GoInsight helps you design smarter, more efficient workflows with powerful AI-driven automation—no complex setup required.
Slack has changed how teams work together. Millions of people use it every day to chat, share files, and stay connected with their colleagues. But here's the cool part: you can make Slack even better by building your own custom bot.
In this guide, we'll walk through everything you need to know. By the end, you'll successfully build a Slack bot to make it do whatever your team needs.
What Are the Benefits of Building A Slack Bot?

Why would you want to make a Slack bot? Think about all those repetitive tasks you do at work. Maybe you're constantly checking the weather, setting reminders, or pulling reports from different tools. A custom Slack bot can handle these tasks for you automatically. It can send notifications, answer questions, or connect your favorite apps together.
The best part is that you don't need to be a coding wizard to build one. With some basic programming knowledge and the right tools, you can create a bot that saves your team hours of work every week.
Prerequisites for Creating A Slack Bot:
Before we jump in, let's make sure you have everything you need. First, you'll want some basic programming experience. Don't worry - you don't need to be an expert. If you can write simple scripts in JavaScript or Python, you're good to go.
Here's what you'll need to get started:
● You'll need a Slack account where you can install and test your bot. Make sure you have admin access to a workspace, or ask your admin to help you out. You'll also need access to create apps in Slack's developer dashboard.
● For development, grab a code editor like Visual Studio Code. It's free and works great for this kind of project. You'll also want to install ngrok, which is a handy tool that lets Slack talk to your computer while you're testing.
● If you're planning to keep your bot running all the time, you might want to look into cloud hosting later. Services like Heroku or Render work well, but you can start with just testing locally.
Step 1: Create a Slack App
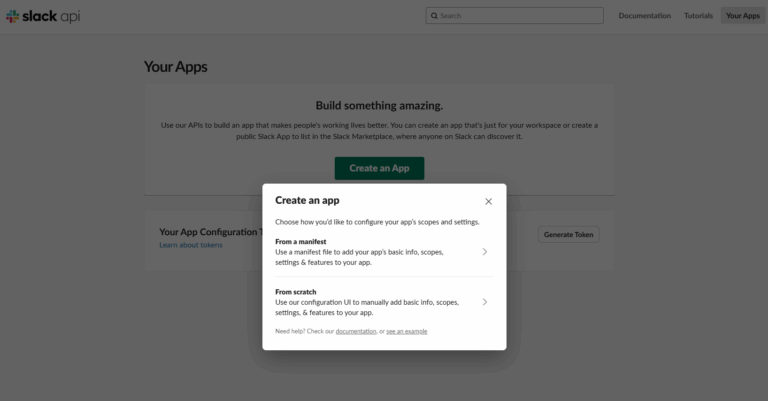
Let's create your bot's home in Slack. Head over to api.slack.com and log in with your Slack account. Click on "Create New App" and choose "From scratch." Give your app a catchy name and pick the workspace where you want to test it.
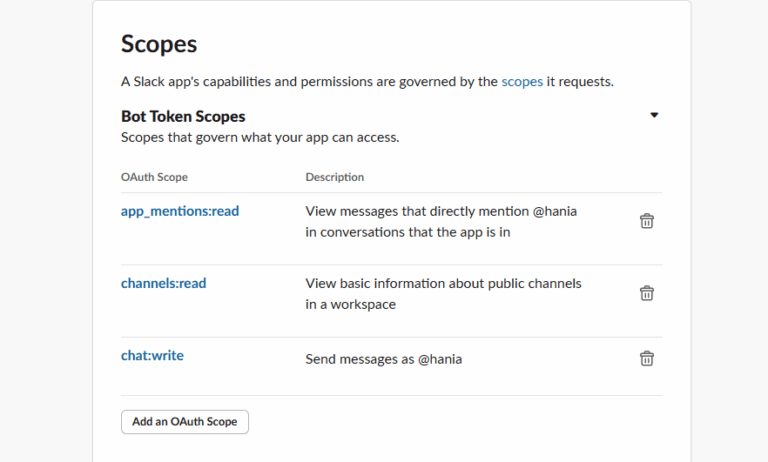
Now comes the important part: setting up permissions. Click on "OAuth & Permissions" in the sidebar. This is where you tell Slack what your bot is allowed to do. For a basic bot, you'll want to add these scopes:
● chat:write so it can send messages
● channels:read to see channel info
● app_mentions:read to respond when someone mentions it
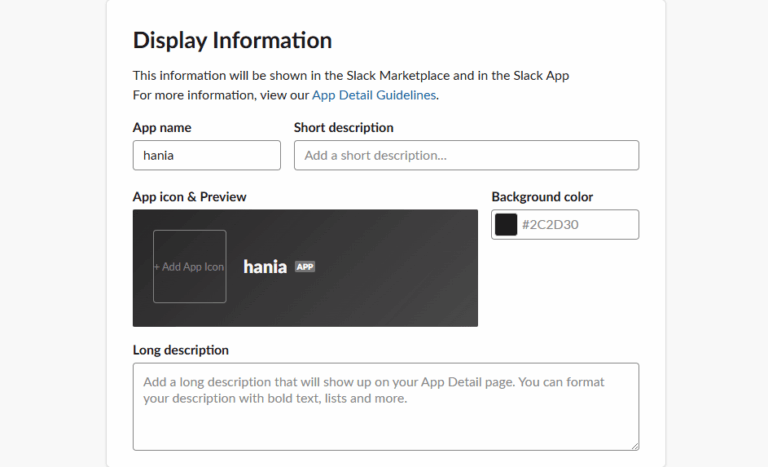
Next, visit the "App Home" section and enable your bot user. You can customize how it looks and what name it shows up as in channels. This is also where you can write a short description of what your bot does.
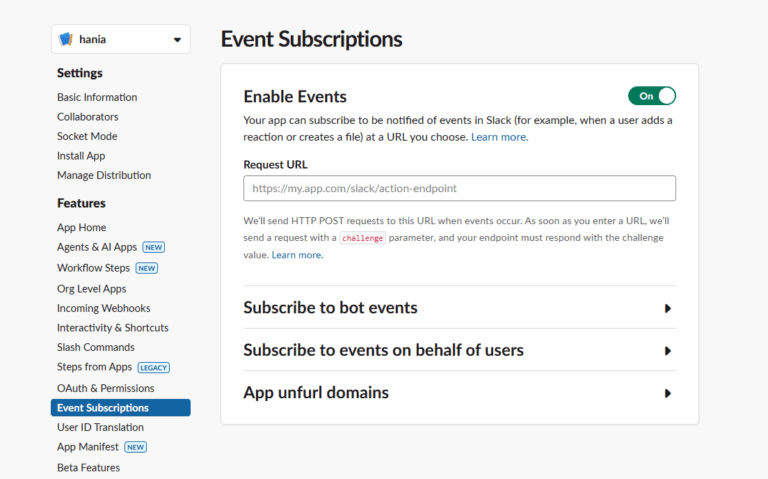
If you want your bot to respond to events like new messages or when someone joins a channel, go to "Event Subscriptions." Turn it on and add your Request URL. Don't worry if you don't have this URL yet - we'll set that up with ngrok in the next step.
Finally, install your app to your workspace by clicking "Install App." This creates your bot token, which is like a password that lets your code control the bot. Copy this token and keep it safe - you'll need it soon.
Step 2: Set Up Your Development Environment
Time to set up your coding environment. You can choose between Python and Node.js for this project. Both work great, so pick whichever you're more comfortable with.
If you're going with Python, create a new folder for your project and set up a virtual environment. Then install the Slack SDK with pip install slack_sdk. You'll also want Flask for handling web requests: pip install flask. Don't forget python-dotenv for managing your secret tokens safely.
For Node.js fans, create a new project with npm init and install the Bolt framework: npm install @slack/bolt. Bolt makes handling Slack events really easy, so it's perfect for beginners.
Create a file to store your secrets (like .env) and add your bot token there. Never put tokens directly in your code - that's a security risk if you ever share your code.
Now let's set up ngrok. Download it from ngrok.com and install it. This tool creates a tunnel from the internet to your computer, so Slack can send events to your bot while you're developing. Run your bot server on a port like 3000, then start ngrok with ngrok http 3000. Copy the HTTPS URL it gives you - this goes back in your Slack app settings as the Request URL.
Step 3: Write Your First Bot Command or Listener
Let's write some code! Start with something simple - a bot that says hello when someone mentions it.
Create your main bot file and import the Slack libraries. Set up a basic web server that can receive events from Slack. When someone mentions your bot, extract their message and send a friendly response back.
Here's what happens: Slack sends an event to your server, your code processes it, and then you use the Slack API to send a message back. It's like having a conversation, but through code.
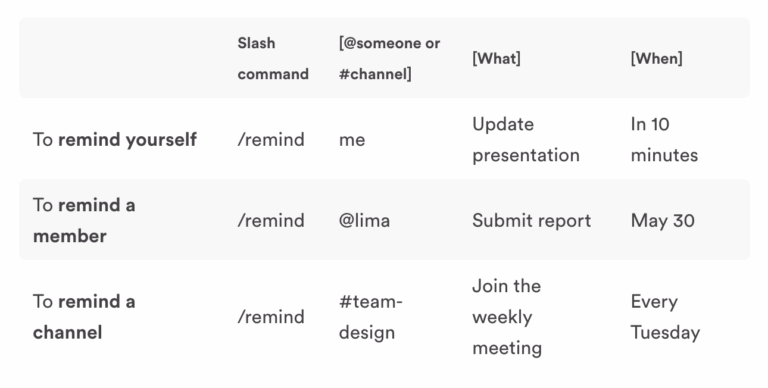
For something more advanced, try creating a slash command. These are special commands that start with a forward slash, like /weather or /remind. Users can type these in any channel, and your bot will respond. Set these up in your Slack app dashboard first, then write code to handle them.
Step 4: Test the Bot in Slack
Time for the fun part - seeing your bot in action! Invite your bot to a test channel by typing /invite @yourbotname or just mention it in a message.
Try out your commands and see how the bot responds. Keep an eye on your server logs to see what's happening behind the scenes. If something's not working, the logs usually tell you what's wrong.
Test different scenarios. What happens if someone sends an empty message? What about a really long one? Make sure your bot handles these edge cases gracefully.
Try your bot in different types of channels - public ones, private ones, and direct messages. Depending on what you're building, you might want different behavior in each.
Optional: Host Your Bot Online

If you want your bot to run all the time, you'll need to host it online. Heroku is popular because it's straightforward to use. Create a Heroku app, add your environment variables (like your bot token), and push your code. Heroku handles the rest.
AWS Lambda is another option, especially if your bot doesn't get used constantly. It only runs when needed, which can save money. The setup is a bit more complex, but AWS has good tutorials.
Newer platforms like Render and Railway are also worth checking out. They often have better free tiers and simpler deployment processes than the older options.
Whatever you choose, make sure to set up monitoring. You want to know if your bot goes down so you can fix it quickly. Many hosting platforms include basic monitoring tools.
Best Practices for Making A Slack Bot
Be respectful of Slack's rate limits. If you send too many requests too quickly, Slack will temporarily block your bot. Add delays between requests and handle errors gracefully when you hit limits.
Make your bot user-friendly. Use clear command names, provide helpful error messages, and include examples in your help text. If your bot can do something destructive, ask for confirmation first.
Keep logs of what your bot does, but don't log sensitive information like user messages or tokens. Good logging helps you fix problems and improve your bot over time.
Conclusion
You've just learned how to build a Slack bot from scratch. This is just the beginning. Your bot can grow to do almost anything your team needs. You could add a database to remember information, connect to external APIs to pull in data, or use AI to make your bot smarter.
The skills you've learned here apply to building all kinds of automation tools. As you get more comfortable with the Slack API, you'll find new ways to make your team's work easier and more efficient.


Leave a Reply.